There are developments in the vinyl skirting that we put up on our new 5th wheel. It’s not good news either.
On a side note, if you’re in the market for a used camper, check out my post that includes quite a few options to find your used camper for sale by owner.
Our order just came in for replacement snaps and pipe clams. Sounds like bad news and it sorta is.
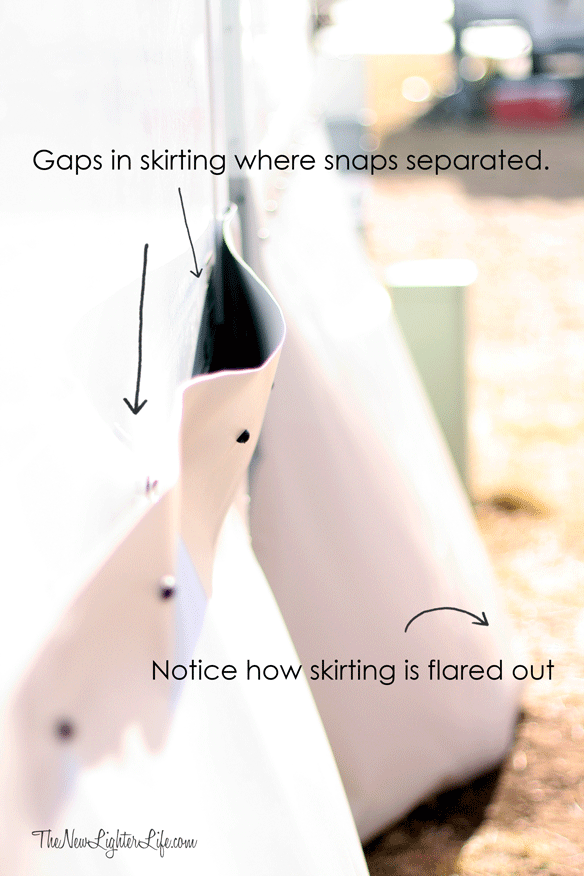
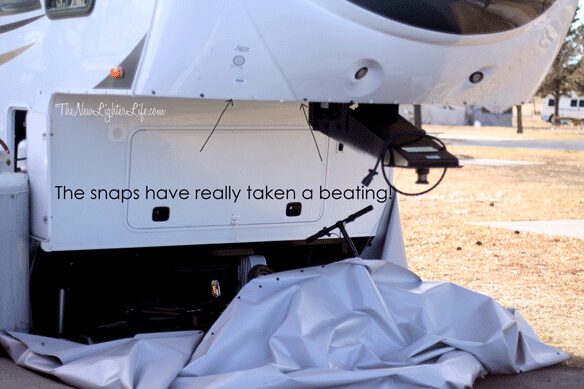
We’ve had some wind since we’ve had the skirting up. Some of our snaps have broken or popped off and caused the skirting to fall. Our 5th wheel enclosure seems intent on coming down.
Ah….the joys of figuring this all out.
The 5th Wheel Enclosure
We were pretty adamant about having the 5th wheel portion skirted.
We could make it work still, I’m sure. But of the 20-some RVs that are parked here for the winter, only a few are fully skirted. So we’re going to admit defeat as far as that portion goes.
We could have saved $200 by NOT ordering the enclosure and we’re regretting that money spent. We’re keeping the enclosure vinyl and may put it up again depending on how cold it gets in our room and what our heating costs are this next month.
The Problems
From what we can figure, this is what we’ve come up with…
- The 5th wheel-end takes the brunt of the wind force.
- Snaps were placed at 10 inches but needed to be spaced even closer because of the wind.
- Our skirting was weighted down with sandbags but that may have been too tightly wedged, causing extra pull on the snaps.
- Because of the tightness, there is even more pressure on the skirting when the wind gets to blowing. So much pressure, in fact, that the skirting ended up looking like this.

- It is highly possible we rushed putting the skirting up. Um, actually we did for sure and ignored the recommended wait time. After attaching the 3M base, it’s important to wait on putting the vinyl up, which ensures the maximum bond strength of the 3m snap base.
- We needed to distribute the pressure evenly on the snaps, which would have been possible with a pipe clamp system rather than sandbags.
Lots of lessons learned on this one!
I contacted EZ Snap Direct to see their thoughts on where we went wrong or if there was some sort of faulty materials involved. They were very helpful and quick to respond to our questions and suggested some of the fixes below
Our Fixes
- More snaps, quite a few more. Since we are in a high-wind area the snaps need to be closer than 10 inches. From EZ Snap,
For extra windy locations, we recommend placing the studs more like every 8″ to 6″ apart. If you use this spacing you will need to order extra fastener sets with your order.
- The snaps need to be allowed to cure. We are leaving them on for a week, even though that length of time isn’t necessary. Call us paranoid but we want to make sure they are really stuck on this time.
- We put the new snaps on when we had a warm day and it was near 60 degrees. We’re hoping it’s close enough to the recommended temperature to be effective.
- We are going to move the sandbags back and use them to stop the skirting from moving too much. This will allow some movement though, rather than wedging them allowing pressure to build up.
- PVC pipe clamps were ordered with the extra snaps. We’ll use them to clamp the skirting down to PVC pipes and more evenly distribute the weight and pressure. The sandbags will stop any flapping.
- Our contact at EZ Snap Direct recommended we superglue any snaps that separated (leaving the adhesive back on the camper)

Conclusion
Oh, to do this again! We didn’t do our homework as well as we had thought. Most certainly, we made mistakes. Overall, I think we would have been better off skirting our RV with Option #1.
As far as the vinyl skirting is concerned, here are our conclusions.
Pipe Clamp System. We should have read about and used the pipe clamp system especially given our windy location.
Snap Spacing. If we had paid attention to the windy area tips, it would not have cost us so much in the long run in added shipping.
Snap Curing Time. We rushed it. Plain and simple, we didn’t wait the recommended time.
5th Wheel Enclosure. As it looks right now, it’s not necessary and is really an added cost. We have our electric and propane costs for November. Of course, weather changes and fluctuates but we’ll see how our bill changes for the month of December without the 5th wheel enclosed.
EZ Snap was great to work with and their product does seem to be high quality. I just wonder if this type of skirting is not the best for windy locations.
We’ll update on how our modifications work after the next blustery day.


Hello! I just read your adventures in skirting your r.v.
I wanted to let you know I am so glad you decided to post this story even though it is “the most boring thing you have ever written” ! I sincerely appreciated this, we are facing the same challenge, how to and with what do we skirt our r.v. Although we do not have the extreme weather you all encounter, it does get fairly cold here in Idaho and like you we are concerned with the cost of heating our unit. I learned alot from this and appreciate all the time and effort it took. Thanks again, I look forward to hearing more articles from you! Karen
Thank you so much Karen! I’m glad it could help though it was painful to write. 🙂 What did you decide on?
We have the same skirting and have faced the issues you have with the wind. We placed our 3m studs 6 inches apart and used the pipe and clamps to secure the bottom. Many of our 3m thibgs have popped off. We ended up using duct tape to keep it secure at the top. The pipe and clamps are too light. We used some rocks and what ever we could find. We are going to remake the skirting over the summer in small sections and hold together with the sticky back velcro (our 5th wheel section is done like that and works really well) As for attaching the bottom….I think we will go with eyelets washers and rail road spikes. Hope yours is sorted now.
I have same system with same issues, I bought new 3m tape for snaps witch seems to work well. Since there tape comes apart not unglued. As for the nose. I am trying 2 inch velco Industrial strength glue tape.