
I originally wrote this post way back in 2012, when I was struggling to adjust to my RV oven. Today, I’ve got some updates for you to help you succeed and overcome that little propane oven. If you’re an RVer and doing any indoor cooking and baking you know that an RV oven can be a challenge. While it is true that RV ovens are not as large or as powerful as the ones in a traditional home, you can still enjoy baking. All you need are the right techniques and a few essential tips for baking in an RV oven. In this post, I’ll share some tried and true tips to help you get the most out of your RV oven and make your RV-baked meals a success.
Before we ever moved into our camper, I had some reservations about baking in my RV oven. Truth be told, I was just waiting for it to fail me when I moved into the camper. I may have been biased going into it. My good friend and fellow newbie full-timer told me she was burning everything in her oven. In fact, she hated her oven so much that she took out her overhead microwave and replaced it with a toaster oven. With that modification, she started baking 90% of her baked goods in her toaster oven and used her RV oven for storage.
So what’s the big fuss and negativity surrounding RV ovens?
Understand the Limitations of an RV Oven
Size Matters
First and foremost, RV ovens are smaller than residential ovens, which means you may need to use smaller baking pans or adjust your cooking times accordingly. I can fit barely my 9 X 13-inch pans in there. I had to part with my half-sheet pans and any 9X13-inch pans that had any type of edge.
Before you start baking, measure the inside of your oven and make sure your baking pans fit. If necessary, invest in some smaller bakeware that is designed specifically for RV ovens.
Temperature Control
RV ovens, especially propane-powered ones, can have temperature fluctuations and hot spots. The propane flame that comes out along the rod from the back of the oven to the front is VERY hot. That may seem like an obvious statement, but baked goods are most prone to burning right along that area. The metal plate right above the propane bar is supposed to distribute heat but it does a poor job.

To ensure even cooking, I recommend you use an oven thermometer to monitor the temperature and adjust the oven dial accordingly. Keep in mind that your RV oven will most likely cook slower or faster than a traditional oven, so be prepared to adjust cooking times as needed.
Preheating is Crucial
While it may feel like a waste of propane, preheating your RV oven is essential for even cooking and avoiding burnt food. Take the time to preheat your oven to the desired temperature before placing your food inside. This will ensure that your food cooks more efficiently and reduces the risk of burning.
NOTE: Unlike a conventional oven, an RV oven does not beep when it’s properly preheated so you’ll need to make sure you check your oven thermometer, which I’ll cover in the next section.
Must-Have Tools for Successful Oven Baking
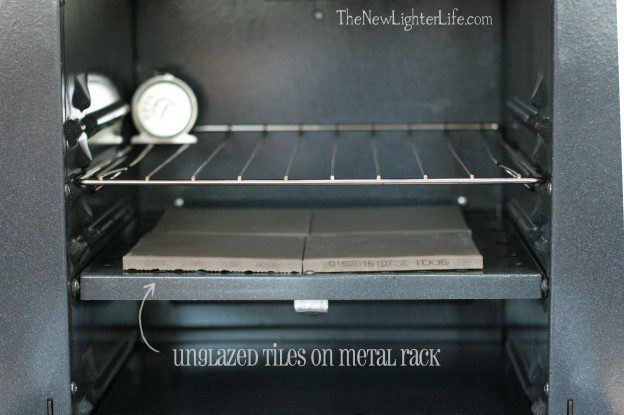
Baking Stones or Unglazed Tiles
This is my favorite and most useful tip on getting that RV oven to work for you. It’s super important to use a baking stone or unglazed tiles. The massive heat from that heating element has to be transferred somehow to get a more even bake of your baking food. There is a thin metal shelf that is supposed to transfer the heat, but it is very inefficient at doing this!
To get a better distribution of heat, all you need to do is place the stone or tiles (I bought mine for $0.44/each at Menards) directly on the oven rack. But make sure that there is enough air space between the stone and the heating element so the heat can be evenly distributed. A round pizza stone or square baking stone works well for most standard-sized RV ovens.
Oven Thermometer
As I mentioned earlier, an oven thermometer is essential for accurate temperature control in your RV oven. Place the thermometer inside the oven and monitor the temperature to ensure it matches up with the oven dial. This will help you avoid undercooked or overcooked food.
Insulated Cookie Sheets or Nested Quarter Sheet Pans
Something I’ve learned over the years is that air space between your pan is super important. The air space helps to insulate the food from the direct heat of the baking stone, ensuring even cooking. A set of two-quarter sheet pans is a versatile addition to your RV kitchen arsenal.
Additional Tools
Other useful tools for successful RV baking include.
- Silicone baking mat – I use mine all.the.time for easy food release and cleanup
- Timer – newer RV ovens have a timer, and you can use your phone but a dedicated magnetic timer is convenient.
- Arc lighter – it’s so much nicer to have a flexible nozzle on a rechargeable lighter. Perfect for reaching that itty-bitty pilot light in the back.
How to Light an RV Oven
Now is the perfect time to discuss lighting that little oven. I recall being baffled that there was not a built-in oven igniter. If you’re a newbie, you actually do have to light the oven with a lighter. I linked to an arc lighter above, which is much handier than even a stick lighter.
Here is a step-by-step guide to lighting your RV oven:
- Turn the oven knob to the “pilot” or “light” position.
- Hold the knob in and use a long lighter or match to ignite the pilot light.
- Keep holding the knob for about 20 seconds to allow the thermocouple to heat up and maintain the gas flow.
- Release the knob and set the oven to the desired temperature.
Perfecting Your Baking Technique
Now that, your oven is heating up, let’s dive into baking methods that are important to keep in mind.
Rotate Your Food
Even with a baking stone and proper temperature control, your RV oven may still have hot and cold spots. To ensure even cooking, rotate your baking dish 90 degrees midway through the cooking time. This will ensure that every part of your food cooks evenly and avoids any burnt or undercooked areas.
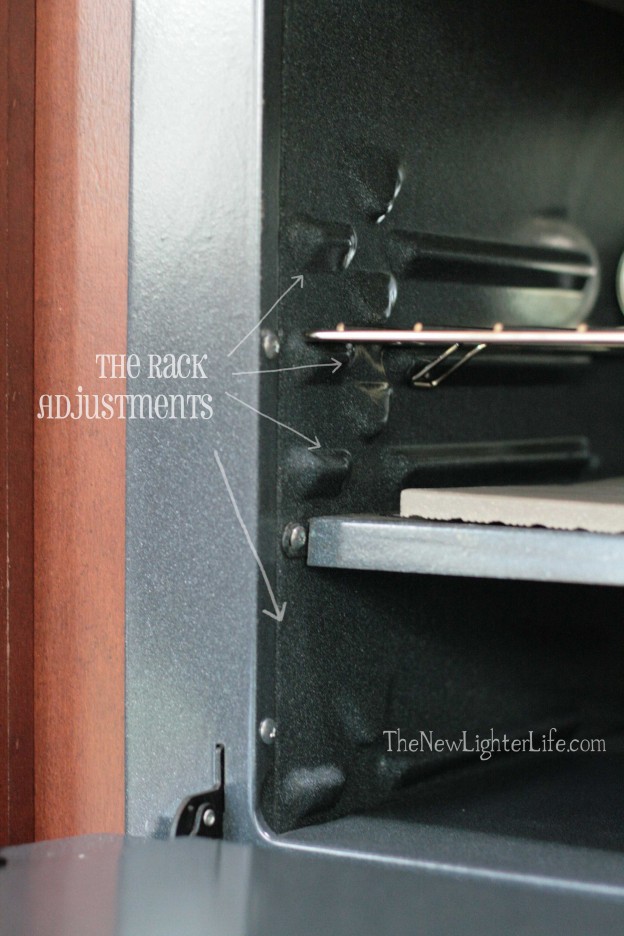
Adjust the Oven Rack
If you find that your food is burning on the bottom or not cooking evenly, try adjusting the position of the oven rack. Most RV ovens have multiple rack positions, allowing you to raise or lower the rack to find the perfect balance between direct heat and even cooking.
Level Your RV
One often-overlooked factor in successful RV baking is making sure your RV is level. An unlevel RV can cause uneven cooking and potentially lead to spills or lopsided baked goods. Before you start baking, use your RV’s leveling system or leveling blocks to make sure your RV is sitting as level as possible.
Adapting Recipes for RV Baking
Cooking Time & Temperatures
When baking in an RV oven, it’s important to be flexible with your cooking times and temperatures. I know I told you that you need an oven thermometer but the sheer size of the oven may require you to adjust your recipes. Keep a notes section on your phone with cooking times and temperatures for each dish you make often, this will help you to become more efficient and precise in your RV baking endeavors. I certainly adjusted to my RV oven and it got easier to successfully baked food the more I baked with my oven.
Recipe Adjustments
Some recipes may need to be adapted for the RV oven environment. For example, if your favorite bread recipe requires an hour of baking time, you may want to consider turning it into muffins or smaller loaves that will cook faster and use less propane. Experiment with different recipe adaptations to find the perfect balance between delicious results and RV-friendly cooking.
Embrace Alternative Cooking Methods
While mastering your RV oven is useful, don’t forget about the other cooking options available in your RV kitchen. Consider using a microwave-convection oven, an Instant Pot, an air-fryer (we have a Ninja Foodie that is an air-fryer, pressure cooker, & more), or even outdoor cooking methods like grilling or using a Dutch oven. Each cooking method has its own unique advantages and can help you create a wider variety of delicious meals in your RV.
Practice Makes Perfect
I know I said this earlier, but it’s worth repeating. The key to success in RV baking is practice, practice, practice. Don’t be discouraged if your first few attempts at baking in your RV oven don’t turn out perfectly. I know mine sure didn’t. Learn from your mistakes, make adjustments, and keep trying. The more you bake in your RV oven, the better you’ll become at mastering the art of RV baking.
Be Prepared for Mishaps
Even with the best RV oven tips and techniques, there will inevitably be mishaps and disasters in your RV kitchen. Be prepared for the occasional burnt or undercooked dish, and always have a backup plan in case dinner needs to be thrown out. Heck! I make mistakes in my traditional home oven. So best to roll with the punches right?! Just remember, mistakes are a natural part of the learning process and will only make you a better RV baker in the long run.
I must share with you one of my early failures with my oven:
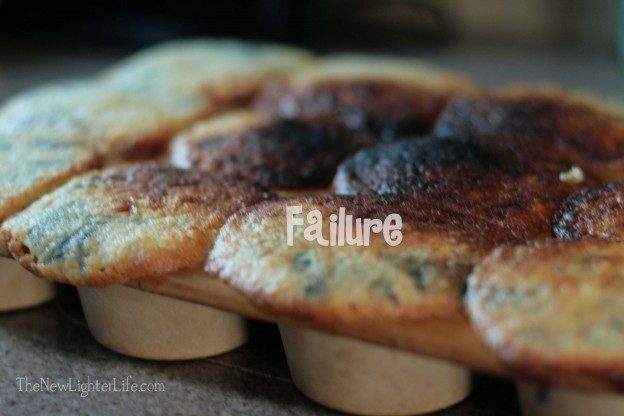
What Went Wrong with Those Muffins?
- The oven was not preheated.
- My temperature was off.
- I tried to cook the flat un-risen tops of the muffins by placing them on the bottom shelf. (yeah…don’t do that)
Onward & Upward RV Oven Baking Success
Hopefully, this picture above encourages you to keep trying. Since originally publishing this post, we stopped RVing full-time. I had about a 5-year gap from using an RV oven and had to refer to my post again because I simply forgot how to make my RV oven work for me.
All this to say, don’t be discouraged. Mastering baking in your RV oven is just one part of the overall RV lifestyle. Enjoy the process of learning and adapting to your new kitchen, and remember that the journey is just as important as the destination. With the right RV oven tips and techniques, you’ll be on your way to creating delicious, home-cooked meals in your RV kitchen in no time.


I tried the tip about a piece of tin to displaced the heat and it work like a charm! Bakes everything perfectly.
I was given a rotisserie convection oven that I ended up using more than regular oven in my home. Also used for toasting bread/bagels, etc so had no need for a toaster. I lost it due to house fire.
Now, living in RV full-time I dont see enough room to cook a chicken in the gas stove inside RV.
I am thinking of getting another rotisserie convection oven and primarily use that for most of the cooking I may need to use an oven for. Good to know others have done the same. I am new to the RV life and was hoping it would ne ok as long as I am hooked up with electric.
A friend that lived in his RV most of the summer offered some great advice in using the oven. I had uneven cooking, overcooking, etc. He said to level the rv to the oven. I also learned that I could not use dark pans. I exchanged them all to the light aluminum, now I have perfect, even cooking.
Are your unglazed tiles porcelain or ceramic? Shouldn’t they cover the entire ‘pan’ rather than as in your picture, which would encourage the heat to be intense on the edges of the ‘pan’ where there is no tile?
Thank you!! I love to bake and I am now baking treats all the time. My banana nut breads come out perfect now
I enjoy camping outdoors and preparing family members’ favorite meals. Of course, long trips aren’t complete without the RV stove, which you can use to cook everything from fried bacon to fresh bread to fried chicken. I use the Atwood 52232 Wedgewood stove and am very satisfied. With the integrated grill/toast function, you can brown or bake foods such as whole chickens and patties. I like the open burner design because it cooks quickly and evenly. I found the
easy to adjust the hob burner from low to high.
The flame is evenly distributed on all sides in both directions, resulting in well-cooked dishes.