
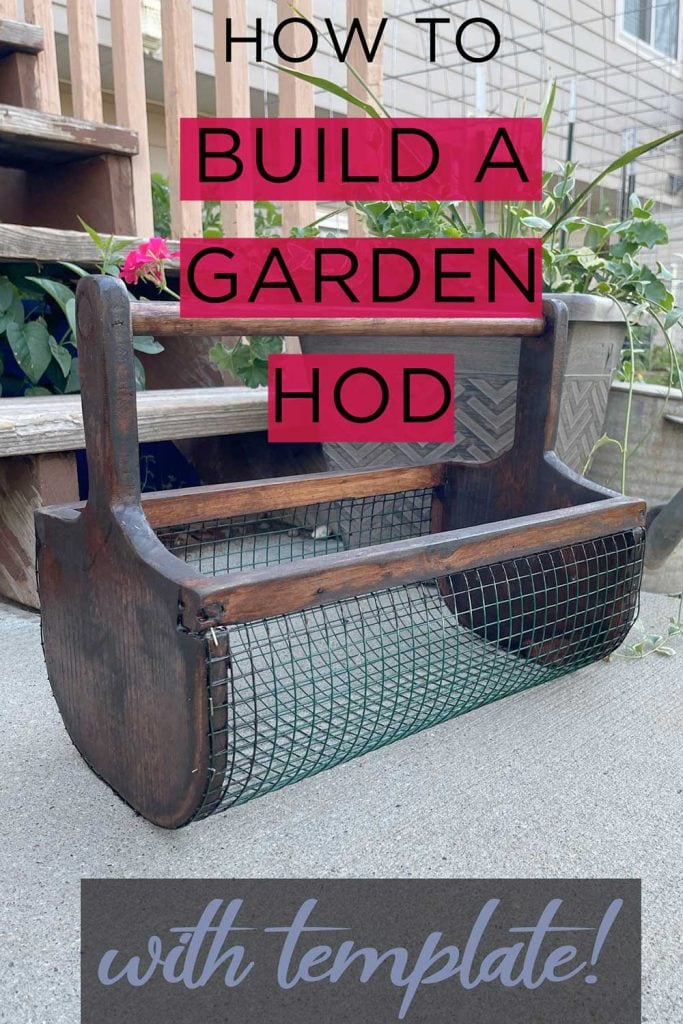
For quite a long time, I’ve been eyeing garden baskets, also referred to as garden hod. In case you didn’t know, a garden hod is a versatile and practical tool for every gardener, making harvesting and washing vegetables and fruits a breeze. This style of basket originated in New England as a clam hod. The wooden and wire mesh basket has become a favorite garden accessory since it’s just so dang pretty and practical. In this guide, I will share with you my DIY garden hod plans (including a template), steps to build one, and some interesting facts about garden hods and their uses.
What is a Garden Hod?

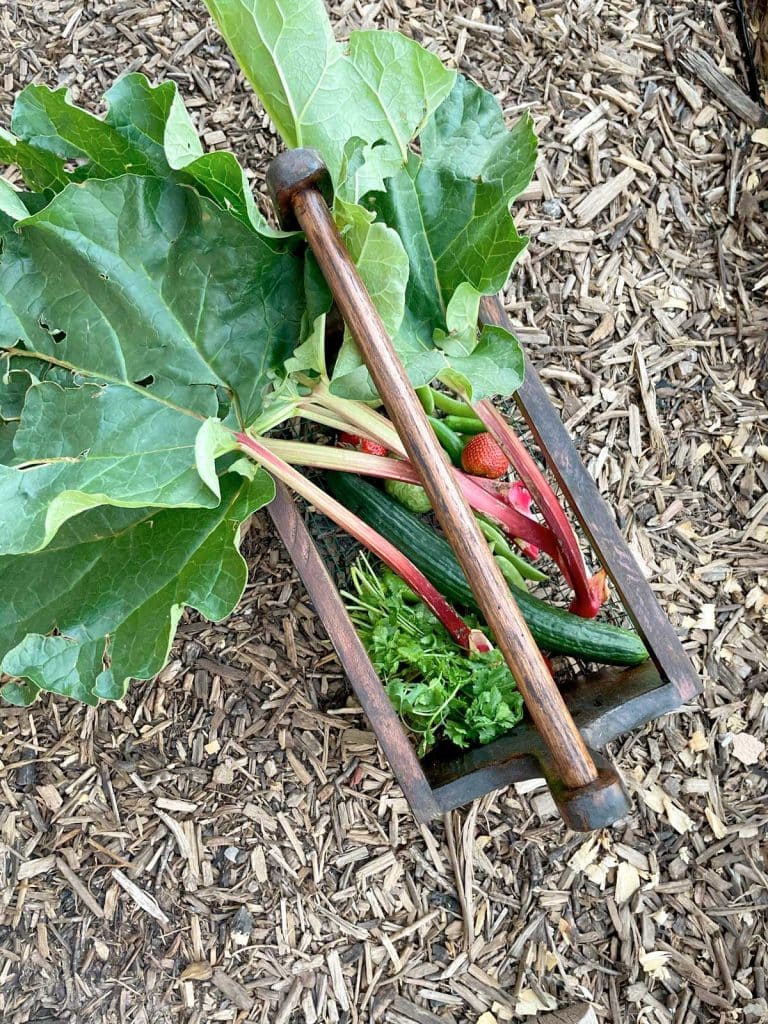
A garden hod is a rectangular or oblong-shaped container made from a combination of wood and wire mesh. This garden basket is designed for collecting, carrying, and washing garden produce. The wooden frame provides support and durability, while the wire mesh allows dirt and water to flow through, making it super easy to rinse off vegetables and fruits before bringing them inside. The name “hod” comes from the traditional clam hod used by clam diggers in New England, which has a similar design for rinsing and draining clams.
Benefits of Using a Garden Hod
There are several advantages to using a garden hod in your garden, including:
- Efficient Harvesting: A garden hod is a convenient tool for collecting garden produce in one trip.
- Easy Cleaning: With the wire mesh design, you can rinse your fruits and vegetables directly in the basket and outside.
- Versatility: Garden hods are not limited to harvesting produce; they can also be used for gathering flowers, carrying garden tools, or even as a decorative item for your plants outside or indoor decor.
- Durability: The combination of wood and wire mesh makes garden hods sturdy and will hold up well for many gardening seasons.
DIY Garden Hod Plans
If you’ve read my blog for any amount of time, you know I can be cheap….err…I mean thrifty. So a few months back, I set out on a quest to build my own garden hod! I really love doing woodworking/crafty projects, so I was up to figuring out how to make one, and maybe gift a few to my gardening friends. I did find a pretty great tutorial from Grit.com that has instructions for building a hod which was a great starting point for my own garden hod plans.
Project Overview
- Template – Through the magic of some graphic software, I made you all a Garden Hod Template that is perfectly symmetrical. When printing the template, I suggest you increase the print size on your printer so that the 1-inch is to scale. At this size, the finished hod will be 9 inches wide and 12 inches tall. You can make the length of the hod however long you like.
- Freehand Shape – The hod I made was somewhat free-styled, and I used various sizes of cans (paint pails and leather spray cans) to get the curved shapes. The result of my shaping of the wood pieces on the fly is that they are not perfectly symmetrical.
- Size of Hod – As I mentioned, my finished hod measures 12″ tall by 9″ wide by 16″ long. You can adjust all these measurements if you prefer a different size; just adjust your cuts accordingly. Instructions below will produce the size of the hod that I have.
- Best Practices – I learned quite a few lessons while making my garden hod, so I will only share my recommendation for the entire process with you. The biggest difference you’ll see in my instructions and the result is the staining which I will get to shortly.
- Skill Level – I would rate this project as easy and suitable for beginner woodworkers. This project is broken down quite thoroughly so if you are a new woodworker, I think you’ll find more than enough information to complete your garden hod. I have links to products if you are unfamiliar with what I have listed or want to find an economical choice for the specific tool.
I tried to be VERY detailed in the instruction as if you had never put together a wood project, so keep that in mind as you go through this DIY.
Without further adieu, instructions on how to make your own garden hod.
Materials & Tools
Cutting Tools
I used a variety of hand tools and power tools for my cuts…here is a quick explanation of your options.
- Circular Saws – to cut my pegs, rail length, and handle length, and a rough cut of my hod ends (you can also use them to rough cut the shape of the hod basked, but it would be tricky, and you’d need to sand quite a bit more)
- Jig Saw – to cut the shape of the hod ends (can also use to cut pegs, rail length, and handle length if you’re in a pinch)
- Table Saw – to rip the rail pieces (if you have a sled, you can also use it to cut the pegs rail length and handle length)
- Handsaw – for hand sawing the pegs off after assembly, (I used a dovetail cut door jamb saw, but you can use any handsaw you have on hand. ALSO: in a pinch, you can use a handsaw for all these different cuts, but it could be tedious and challenging.)
General Tools
- Pencil
- Measuring Tape – my favorite is the Lufkin Self-Centering
- Carpenter Square (if making your own design)
- Paint Can or jar (if making your own design)
- Garden Hod Template (if NOT making your own design)
- Sander – my favorite is an orbital type
- Flush Cut Pliers
- Painters Tape (for marking drill bit depth)
- Drill
- 5/16-inch drill bit (for making holes to insert wood pegs)
- 3/4-inch drill bit (for making a hole for the dowel handle)
- Staple gun OR Pneumatic Stapler and air compressor
- Hammer
- 12-inch Wood Clamps (qty: 2)
Materials List
- 4-foot length of a 9-inch X 1-inch wood (the minimum amount needed for 1)
- 3/4-inch wood dowel (16-inch length minimum)
- 5/16-inch wood dowel (hardwood is best)
- 1/4-inch Hardware Cloth (likely cheaper locally)
- Wood Glue
- U-type for Staple Gun OR 1/2″ Narrow Crown for Pneumatic Stapler
- Stain/Sealant (optional – see the note above about staining and finishing)
- 60-grit sandpaper
- 4 1/2-inch brad nails with nailer (or small nails and hammer)
Cut List
Start by cutting the wooden pieces for your garden hod according to the following dimensions:
- 9-inch x 1-inch board (which is actually 3/4-inch rather than 1-inch)
- 13-inches long (qty: 2) – End Pieces
- 16-inches long (qty: 1) – Rail Pieces:
- 1-inch wide (qty:2) (which results in rails that are 3/4-inch by 1-inch by 16-inches)
- 3/4-inch dowel – cut 16-inches long (qty: 1) – Handle
- 5/16-inch dowel – cut 1 1/2-inch long (qty: 4) – Pegs
Preparing Wood Pieces
- With your two end pieces, place the template on top and trace each one. Alternatively, you can create your own template on one of the boards and use that as a pattern for the other board. Trace your pattern on the board with a pencil.

- Using a jigsaw or some other cutting tool, cut around the template, careful not to cut over the template lines you drew (you will sand the pieces down and make micro-adjustments).
- Once both end pieces are cut, sand them with the sander to shape them further and smooth the edges.
- To measure a cut slot for the rails, with your straight edge, measure from the corner of each end piece 7/8-inch over and 1 1/8-inch up. There will be two notches marked for each end piece. (The location is roughly sketched on the template – use your measurement instead of a dotted line.)
- Carefully cut the marked notch out with a jigsaw or hand saw. Sand edges slightly.
- To cut a hole for the dowel/handle, fit your drill with the 3/4-inch drill bit and cut a hole into the center of each top portion of the end piece (1 hole in each piece).
- Give your wood pieces a light sanding and wipe free of any sawdust.
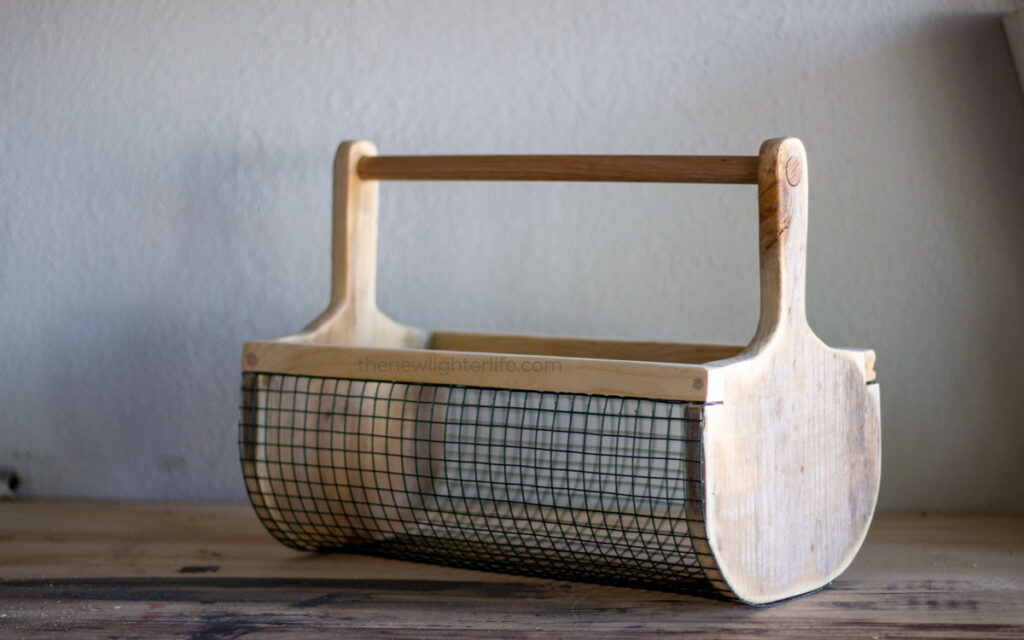
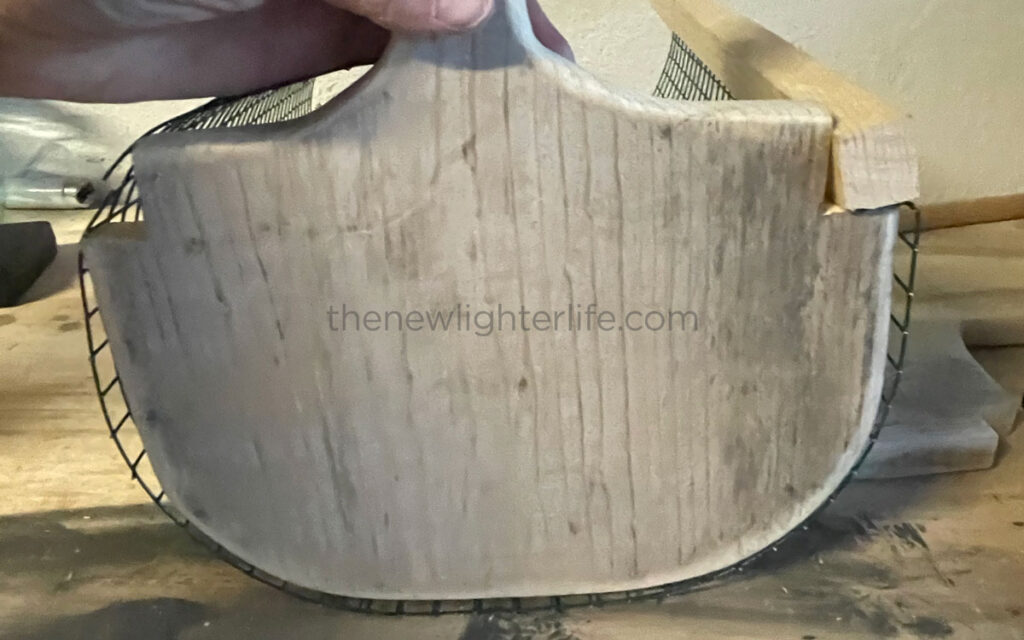
- Stain all your wood pieces now and let dry completely before assembly below. NOTE: I did NOT do this and had some issues with my stain. This is why my pictures are unstained until nearly the end of the process.
Next, mark your wood ends according to my template or by using a quart-sized paint can as a guide. Make radius cuts to the end pieces, and smooth any rough edges by sanding. In each end piece, cut a 3/4″ x 1″ notch in each top corner. Sand the pieces to shape them further and smooth the edges.
Assembling the Garden Hod
Once your wooden pieces are cut and prepared, follow these steps to assemble your garden hod:
- Attach the Hardware Cloth to Rail – To attach, take the stapler or pneumatic stapler and appropriate staples and fasten the outer side of the cloth to the 3/4-inch side (or smaller side) of one of the rails.
- Bend the Hardware Cloth – Against your workbench, bend the hardware cloth towards the inside of the roll to form a 90-degree angle (you can also use needlenose pliers).
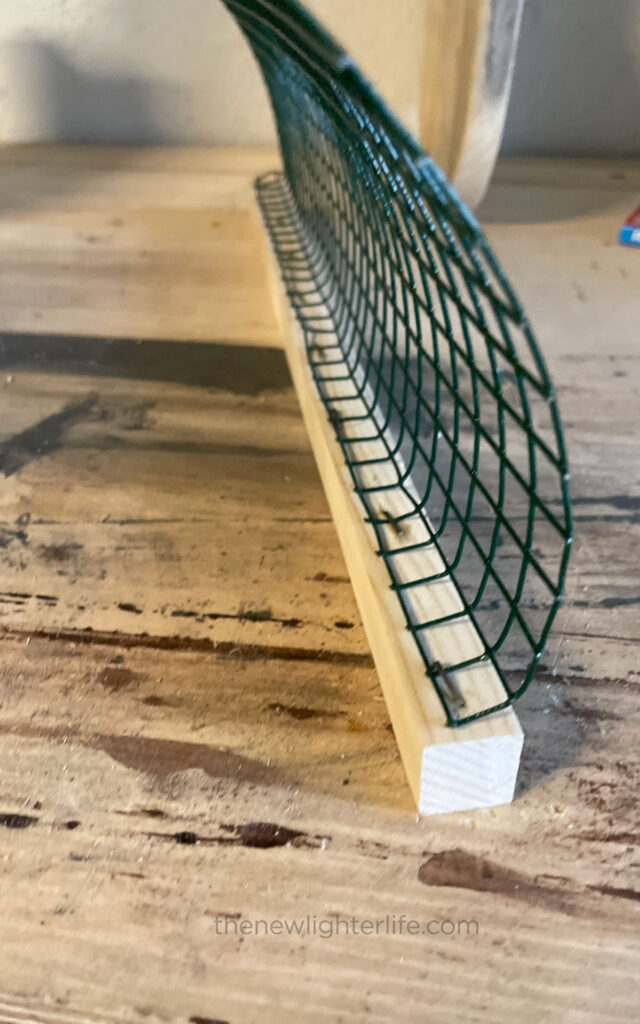
- Shape Cloth for Cutting – Position the rail with the hardware cloth to the hod end, where the notch was cut out. Wrap the hardware cloth around the hod’s end piece. With the flush cut plier, cut where the wire meets the inside corner of the notch. Make sure this is taut, or else adjust your cut to allow you to affix the hardware cloth firmly. This will allow you to determine the exact size of hardware cloth needed.
- Attach, Bend, & Shape Cloth on 2nd Rail – Repeat steps 1-2 above for the remaining rail piece.
- Attach Rail to End Pieces – To attach the rail pieces, assemble all your wood, including inserting the 3/4-inch dowel into the handle hole.
- Drill Holes in Rails for Pegs – Hold your rail piece in place exactly as you want it attached. With your drill and 5/16-inch drill bit, drill a hole all the way through the rail piece. Let the bit kiss the hod end piece so you can drill where needed in the next step 13. Repeat for each of the 3 remaining ends of the rail pieces.
- Drill Holes in Ends for Pegs – With some masking or painter’s tape, wrap your drill bit about 1/2-inch away from the tip. This will allow you to drill into the end piece at the proper depth for the pegs. Drill into the marked part of the end piece to the depth of the painter’s tape.
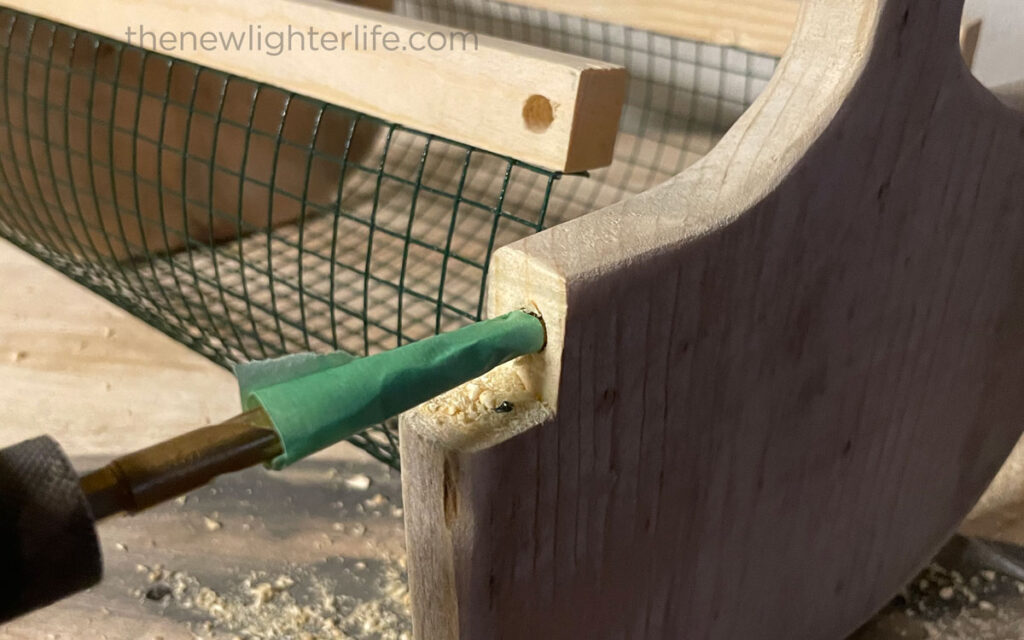
- Glue Holes & Insert Pegs – Drop some wood glue into the hole in the end piece, position your rail piece over the glue-filled hole, place a little glue in the rail hole, and insert the peg. You may need to hammer lightly to get the peg inserted. The peg should stick out a little bit and will be cut off soon. Repeat for each of the remaining ends of the rail pieces.
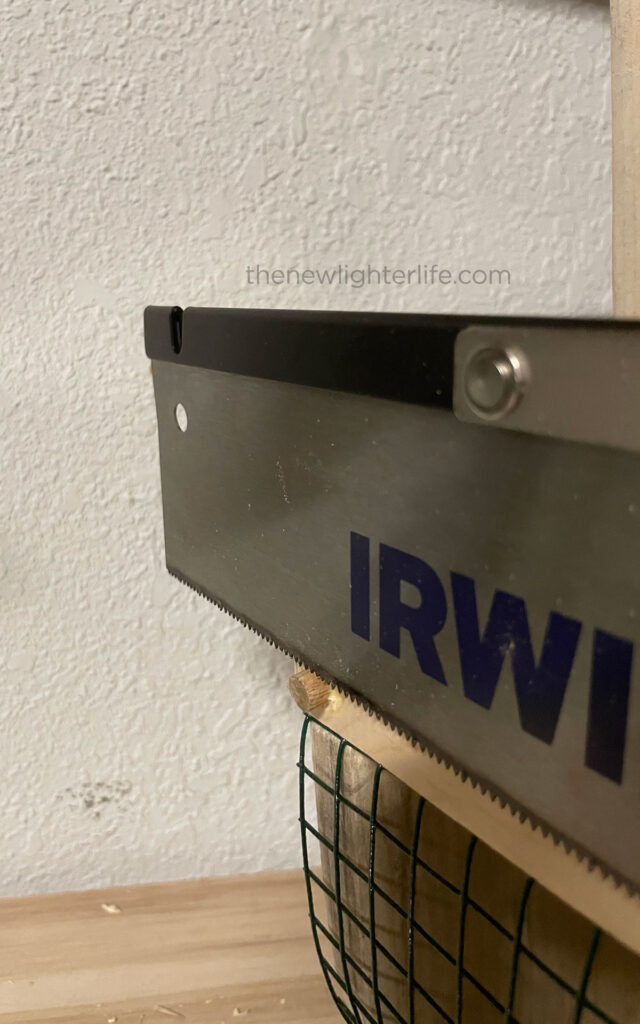
- Flush Cut Pegs – Cut any portion of the pegs that are not flush with the rail.
- Clamp Rails – With your two clamps, clamp the rails to the hod end, one on each end.
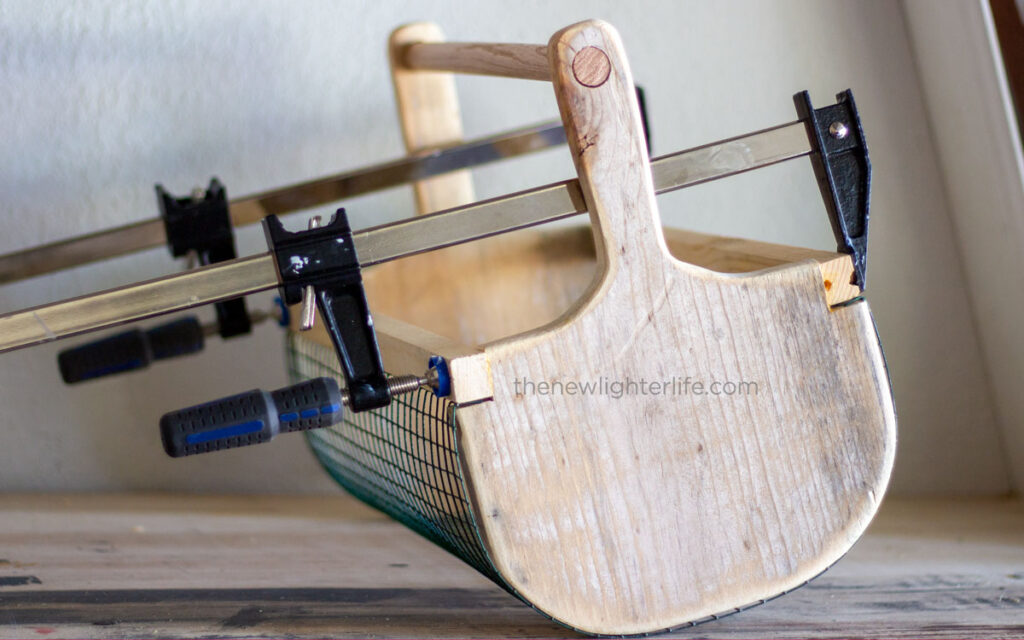
- Glue & Insert Handle – Place some wood glue on the 3/4-inch round dowel and insert it into the hole previously drilled for the handle.
- Secure Handle – With your brad nail, hammer the dowel in place, two nails on each side of the basket.
- Let Dry – Let clamped and glued basket dry for at least 6 hours.
- Attach Hardware Cloth – With your stapler or pneumatic stapler, attach the hardware cloth to the end pieces all around the curve of the end piece.

Finishing Touches – To Stain or Not?
Most garden hods I have seen have natural wood finishes. I used some scrap lumber from my old raised garden bed that was aged and weather-beaten. For that reason, I decided to stain/seal my piece of wood. I had a few mishaps along the way, and I ended up staining with a polyurethane stain combination, sanding, and then staining with a dark walnut stain. The result was a very dark and aged-wood look. My daughter asked me if the basket was an antique, so I think that might have ended up with a winner as I love all things old.
Regardless, you may want to seal your basket. I used polyurethane spray – which has a 24-day cure. Personally, as far as food safety, I’m not concerned about produce sitting in my basket for a short period of time before I take it out. However, if that is a concern of yours, then check out this post about food-safe finishes for wood projects. If you decide to stain or finish your basket, I HIGHLY recommend you seal/stain BEFORE you assemble (unlike what I did).
Alternative Designs
While my garden hod plan is based on the traditional Maine clam hod design, you can customize your garden hod to suit your preferences and needs. Some alternative design ideas include:
- Adjusting the size of the garden hod to accommodate larger or smaller loads of produce.
- Using different types of wood, such as reclaimed materials, for a more rustic or eco-friendly option.
- Painting or decorating your garden hod to match your personal style or garden theme.
- Incorporating additional features, such as a lid or built-in compartments, for added functionality.
Cost & Savings of a DIY Garden Hod
Building your own garden hod is more cost-effective than purchasing a pre-made one. If you use scrap wood, you can potentially create a garden hod for less than $25. Most store-bought garden hods I found cost between $50 and $70. I’ve had a few readers mention they were going to make multiple baskets for their friends as gifts. Plus if you’re customizing the size, design, materials, and features, you are creating a one-of-a-kind that can’t be purchased.
Buying a Garden Hod: Options & Recommendations
If you prefer to purchase a garden hod rather than build one, there are several options available. You can find garden hods at gardening supply stores, home improvement stores, or online retailers. Some recommended garden hods for purchase include:
- Gardener’s Supply Company Garden Hod – traditional garden hod
- Maine Garden Hod – traditional garden hod
- Fiskars Plastic Garden Basket – a plastic basket that is very practical for the garden and less costly
These options provide various sizes, styles, and features to suit your gardening needs.
Final Thoughts on Making a Garden Hod
If you made it to the end, bravo! I know this was a lengthy post. I just want to close with my love for my garden hod. I made this basket 2 years ago and it’s still kicking. It’s been an invaluable tool that’s pretty and practical, providing convenience and efficiency during harvesting and cleaning produce. With my DIY garden hod plans, you can create a custom garden hod tailored to your needs and preferences. Whether you choose to build your own garden hod or purchase one, having a garden basket is a wonderful tool for your garden.
Blessings!


Really nice looking basket, can’t wait to make my own. Thank you
jeraldellington13@gmail.com
Thanks Jerry! Good luck!
I’ve been looking for something I can make myself and not have to ask my hubby to do it. These are nice, clear instructions with a lot of constructive information. Thanks!