

I’ve got a big update to my grandma’s classic crochet Christmas Stocking Pattern. This holiday season, why not whip up some granny square Christmas stockings to give your home a vintage, handmade feel? Today, I’m sharing a free crochet pattern so you can make your own!
There is also a printable PDF pattern that is available in my store for just $2.99 if you prefer to save your pattern in an easily accessible PDF or print it off, (plus your support helps me keep the lights on at TheNewLighterLife.com) 🥰
If you’re interested in purchasing the PDF pattern, you may click the image below (or for the free version, you can scroll down to the details in this post).
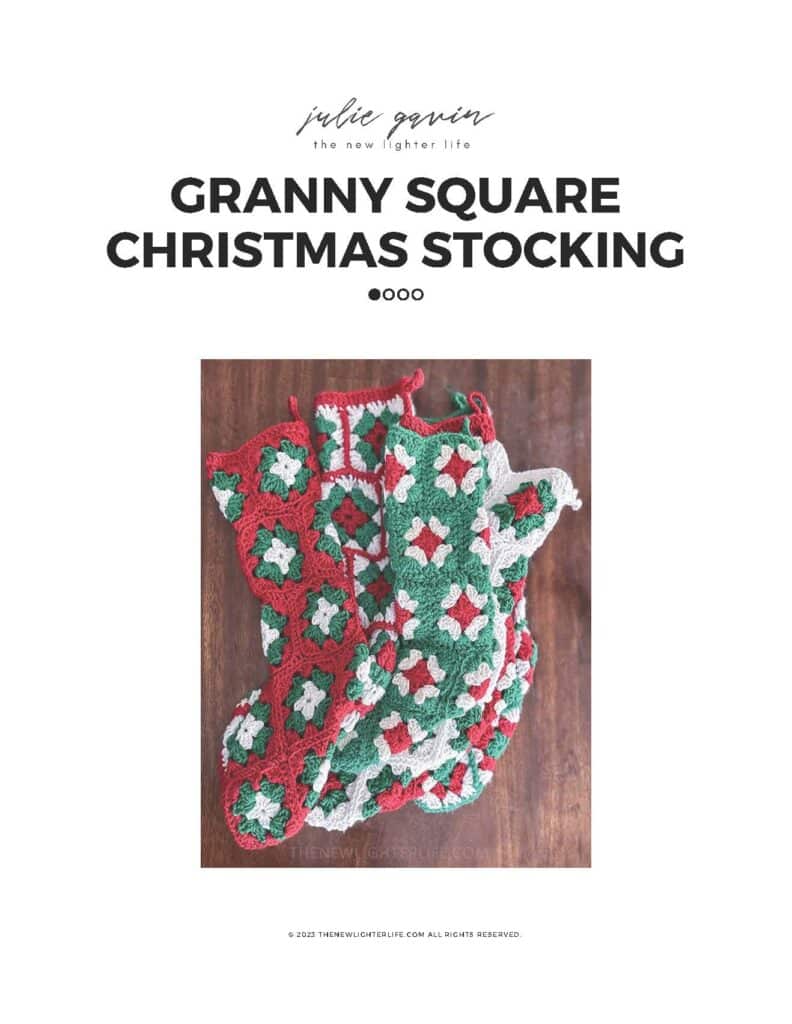
Overview of Crochet Christmas Stockings
Crocheting Granny Squares is an ideal pattern to start with for those new to crocheting. If you require a visual demonstration, I put together a video that provides detailed instructions on how to make a granny square and one of the many methods of joining the squares together. If you’d like to take a look, you can find it below!
Updates to Pattern Heel Block (Triangle)
PLEASE NOTE: I’ve received many comments from readers on doing the heel of this pattern differently. My 40+ year old stocking crocheted by my dear grandma, was a traditional square that she stitched to form a heel (the video includes those original instructions). However, my updated instructions in this post and the PDF pattern available for purchase strictly outline instructions for crocheting a proper heel and a 3-sided granny “square.”
Our Family’s History With These Stockings
My grandma crafted stockings as gifts for me and all my 17 cousins when we were infants for Christmas. A few of us grandchildren managed to convince her to crochet additional stockings for our children, her great-grandchildren.
As the years went by, I was unable to bring myself to ask my grandma for more stockings due to her health and the demands of more and more great-grandchildren. For this reason, I set out to crochet stockings for my own for my children (and potential future grandchildren). Sadly, my grandma passed away six years ago and I regret that I never got her exact pattern. Despite having completed a number of crochet-related projects like afghans, Slouchy American Girl Doll beret, baby blankets, and a scarf (or three), this granny square stocking pattern was overwhelming for me to think about recreating.
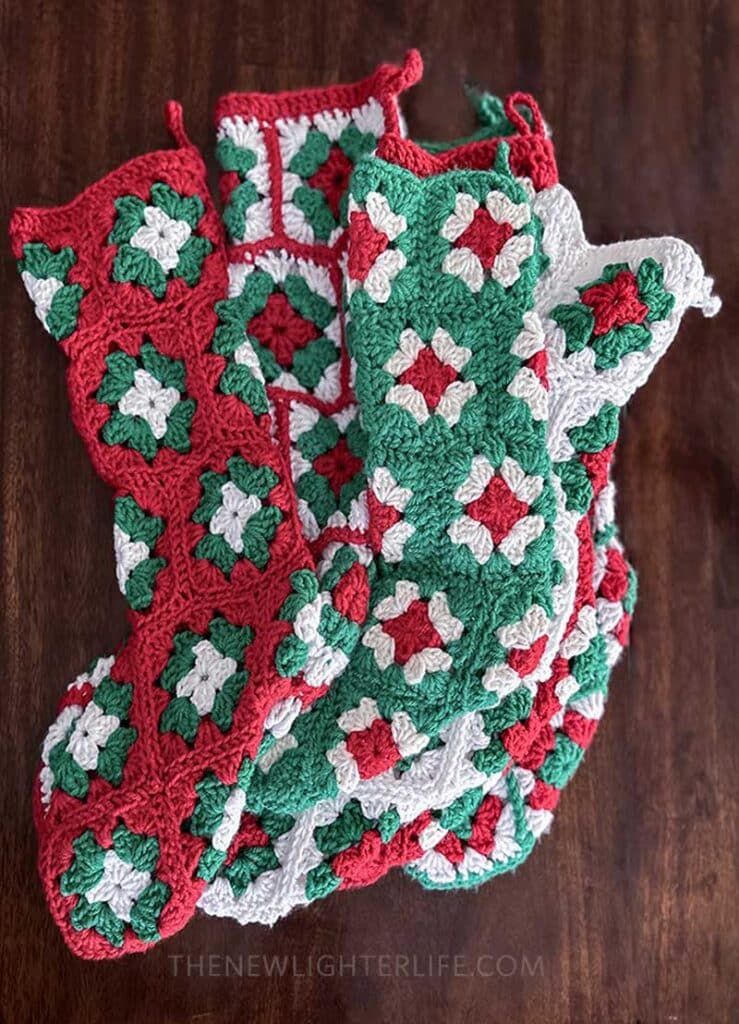
Over 10 years ago, I found a crochet Christmas stocking pattern to use, even though it didn’t match my grandma’s (this is the far left stocking in the photo below). I’ve had a few requests for this stocking pattern, so if you’re interested you can find the pattern, here.

Recreating My Grandma’s Granny Square Christmas Stockings
A few years back my mom and I chatted about recreating my grandma’s Christmas stockings, to carry on the tradition. We decided on the design together, and I’m thrilled to be able to share it with you today!
I’ve made my fair share of granny square blocks before. In fact, my mom taught me to crochet when I was newly married and my first project was a granny square afghan. Needless to say, these blocks are not complicated and very quick to whip up.
A Few Notes Before You Begin
Assembling the Blocks
The magic of the pattern is in the assembly. Pay close attention to the images and directions for assembling the blocks correctly. It may be challenging to properly position the blocks, specifically for the heel and toe of the stocking. But I have loaded so many photos and broken them down to clear up any possible confusion.
Joining Methods
There are many methods to joining granny square blocks that you can find in pattern books or through a simple Google search. A breakdown of some of the techniques in these photos are:

Slip Stitch – this is done by placing the wrong sides of your finished blocks together and sliding the crochet hook into the outside loop of both blocks’ outer loop edge stitches. The joining yarn will be below the hook as you work along the block with a slip stitch.
Single Crochet – again, you’ll place the wrong side of the blocks together and slide the crochet hook into the outside loops of both block’s outer edge stitches. The joining yarn will be on the top of the hook.
Back Loop Whipstitch (Sewn) – with a blunt wide-eyed needle, sew the blocks together by sewing through the outside loops of both blocks’ outer edge stitches. (THIS IS MY FAVORITE JOIN)
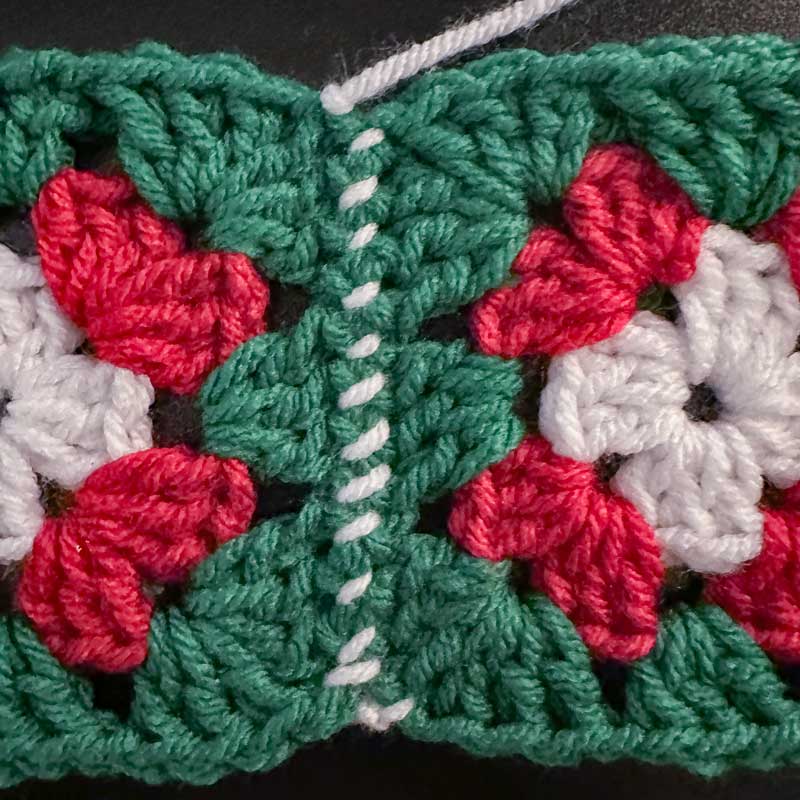
2 Loop Whip stitch (Sewn) – with a blunt wide-eyed needle, sew the blocks together by sewing through the two top posts of the blocks’ outer edge stitches. This will significantly reduce the space between the blocks and result in a “tighter” stocking.
Tension
Depending on how tightly you crochet, the size of your stocking will change significantly. Since these stockings hung on a mantel/fireplace and they’re not worn, this is not a concern.
However, the differing tension between my mom’s crocheting accounts for the vast differences in sizes for some of these stockings on this post)
Color Combinations
I went with a traditional red/white/green color scheme but the sky is the limit on color combinations. One of my favorite sites to look at for exploring new color schemes is Coolors.
You can create a completely different stocking if you change the color of your joining yarn with a single crochet (see #2 & #4 below).
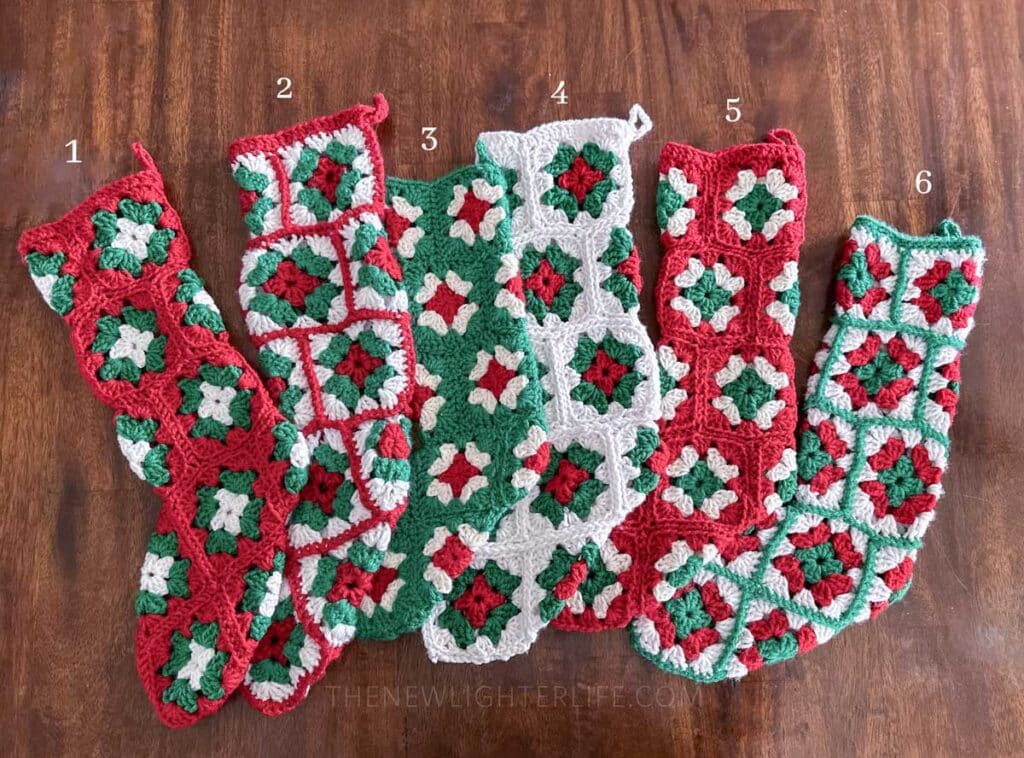
With these 3 colors, the potential color order/combination is as follows:
Finishing the Top Edge
Some of my stockings have a single crochet (#3 & #6) at the top of the stocking, while others have a double crochet (#1, #2, #4, & #5). The choice between the top edge is entirely up to you.
Granny Square Stocking Crochet Pattern
Please note that this pattern is written in US crochet terminology. A printable version of this pattern may be purchased here.
Materials
Hook
- 5.5 mm (US size I-9 or UK size 5)
Yarn
- Weight = 4
- 175 yds (combined total )
- Hobby Lobby, “I Love This Yarn”
- Color 1: White (Antique White or White used)
- Color 2: 40 Red
- Color 3: 181 Jelly Bean
Notions
- Scissors
- Wide – Eyed Blunt Needle (if using a whipstitch join)
- Aleene’s Quick Dry Fabric Fusion Glue
Gauge
- 2 3/4″ (after 2nd round)
- 3 3/4″ x 3 3/4″ (finished block
Final Size
- 5 1/2″ x 20″ (without loop for hanging)
Pattern Abbreviations
- ch = chain
- dc = double crochet
- rep = repeat
- rs = right side
- rd = round
- sc = single crochet
- slst = slip stitch
- sp = space
- st(s) = stitches
- ws = wrong side
Special Stitches
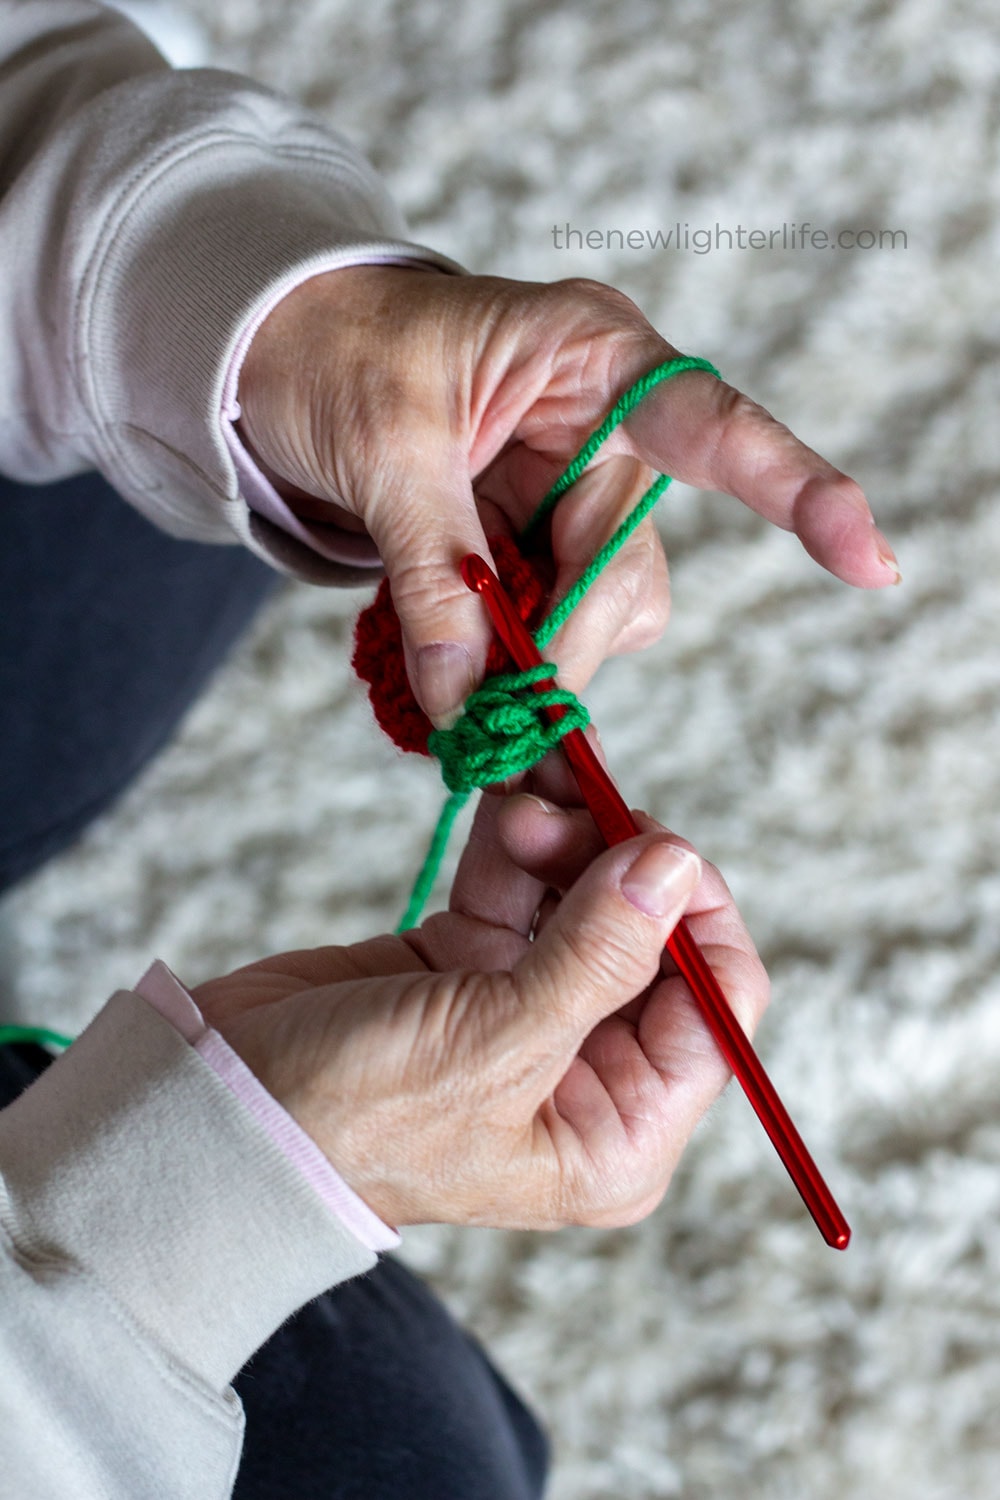
Invisible Join – I prefer to use an invisible join for my last round of the granny square. (for rounds 1 & 2, a simple slip stitch is sufficient). To see how I do my invisible join you can watch this short video below.
For sections with a beginning * and an end *, repeat those stitched the number indicated right after end *.
Traditional Granny Square (Make 15)
Begin with your desired color for the center. You can use a magic ring for your beginning or follow the instructions for the traditional beginning ring below. If changing colors between rounds, cut yarn and leave a 2-inch tail between rounds, tie off to secure.
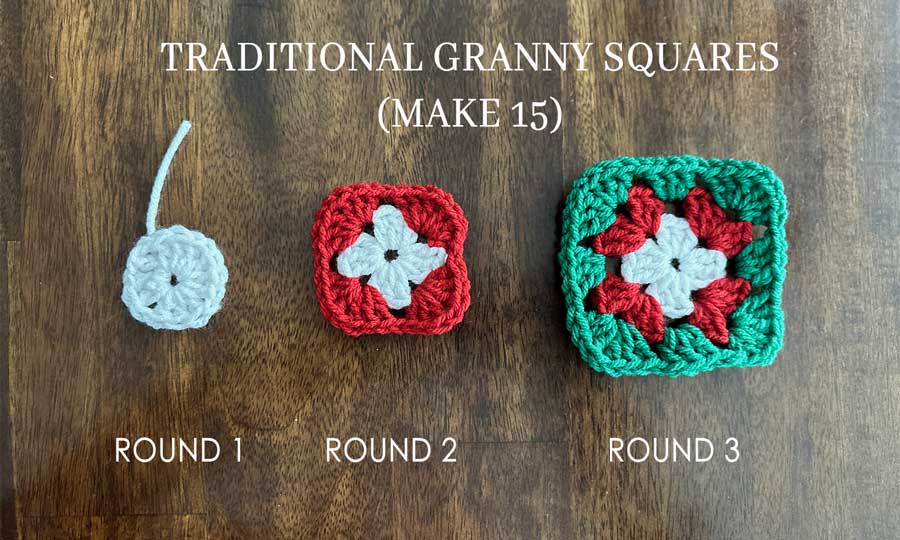
Begin With a slip know, ch 4, slst to join ring.
Round 1 Continuing with the same yarn on rs, ch-3 (counts as dc), 2-dc into ring, ch-1, *3-dc, ch-1* (rep 2 more times). Slst into 3rd ch of ch-3 to close the ring. (12).
Round 2 To rs, attach 2nd color to ch-1 sp from rd-1 with a knot, ch-3 (counts as dc), 2-dc, ch-1, 3-dc into 1st ch-1 sp from rd-1, *work corner of next ch-1 sp of rd-1 (ch-1 + 3-dc + ch-1 + 3-dc)* (rep 2 more times), slst into 3rd ch of ch-3 to close rd (24).
Round 3 To rs, attach 3rd color to a corner ch-1 sp from rd-2 with a knot, ch-3 (counts as 1 dc), 2-dc, ch-1, 3-dc into same ch1 sp, work into side ch-1 sp of rd-2 (ch-1 + 3-dc),* ch-1, work into next corner ch-1 sp of rd-2, (3-dc + ch-1 + 3-dc), work into side ch-1 sp of rd-2 (ch-1 + 3-dc)* (rep 2 more times), invisible join into 3rd ch of ch-3 to close rd. (36).
To Finish Block Ensure all yarn is tied off and ends are weaved in. If you’d like, apply a tiny amount of fabric glue to secure knots.
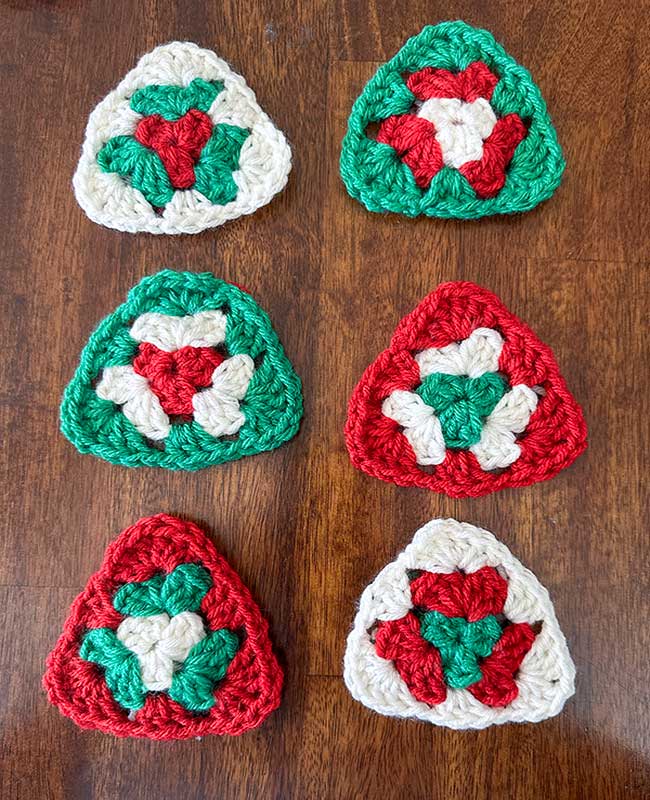
Triangle Granny “Square” (Make 1)
This block is used for the heal of the stocking.

Begin With a slip know, ch 3, slst to join ring.
Round 1 Continuing with the same yarn on rs, ch-3 (counts as dc), 2-dc into ring, ch-1, *3-dc, ch-1* (rep 1 more time). Slst into 3rd ch of ch-3 to close the ring. (9).
Round 2 To rs, attach 2nd color to ch-1 sp from rd-1 with a knot, ch-3 (counts as dc), 2-dc, ch-1, 3-dc into 1st ch-1 sp from rd-1, *work corner of next ch-1 sp of rd-1 (ch-1 + 3-dc + ch-1 + 3-dc)* (rep 1 more time), slst into 3rd ch of ch-3 to close rd (18).
Round 3 To rs, attach 3rd color to a corner ch-1 sp from rd-2 with a knot, ch-3 (counts as 1 dc), 2-dc, ch-1, 3-dc into same ch1 sp, work into side ch-1 sp of rd-2 (ch-1 + 3-dc), *ch-1, work into next corner ch-1 sp of rd-2, (3-dc + ch-1 + 3-dc), work into side ch-1 sp of rd-2 (ch-1 + 3-dc)* (rep 1 more time), invisible join into 3rd ch of ch-3 to close rd. (27).
To Finish Block Ensure all yarn is tied off and weave in ends. If you’d like, apply a tiny amount of fabric glue to secure knots.
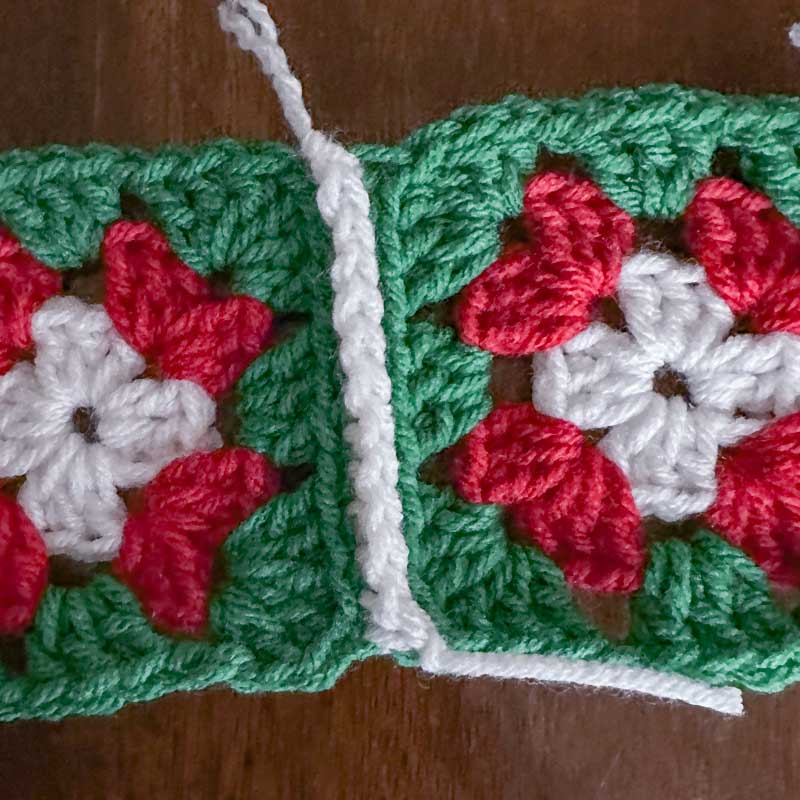
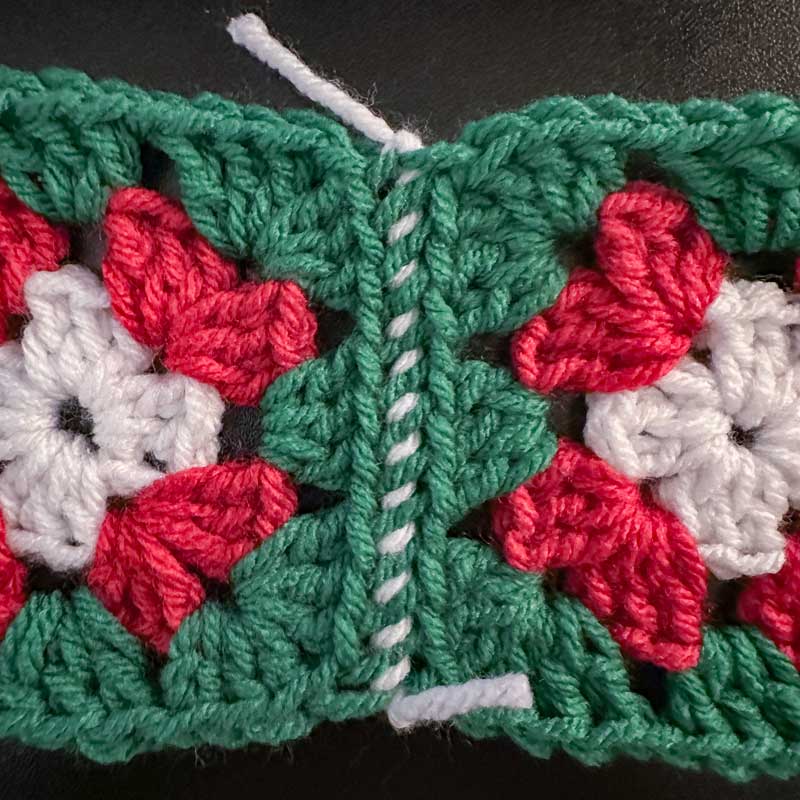
Join the Blocks
Once all blocks are complete, tied off, knots are secured with glue (optional), and woven in, you will begin joining your blocks with your selected join method (slip stitch, single crochet, back loop whipstitch, or 2-loop whipstitch)
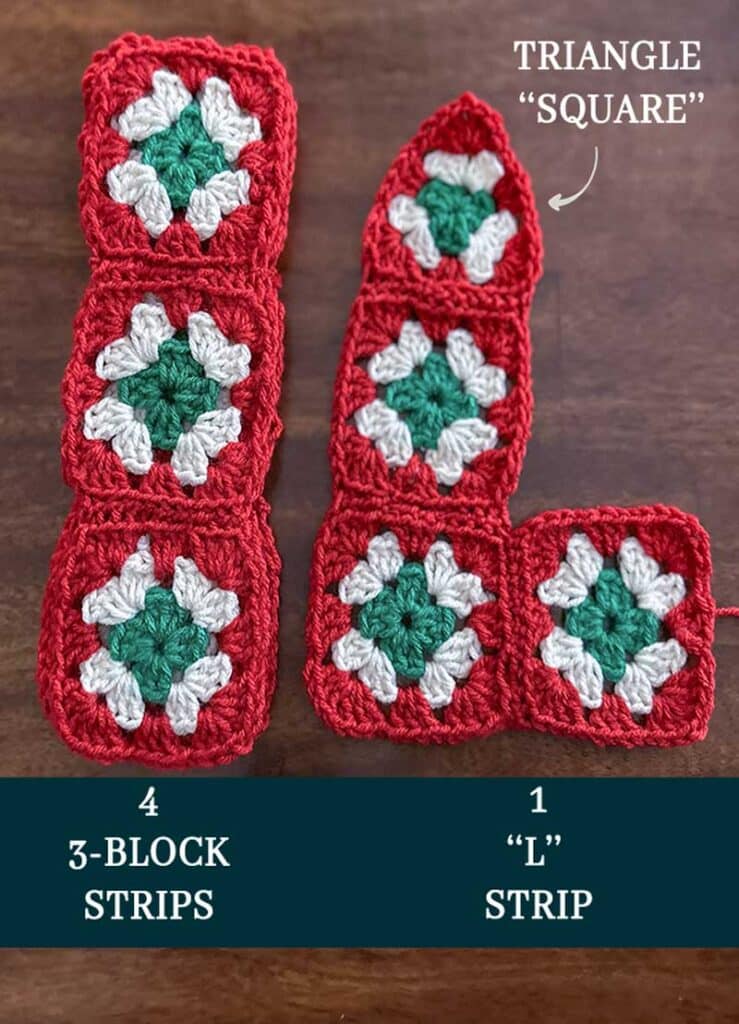
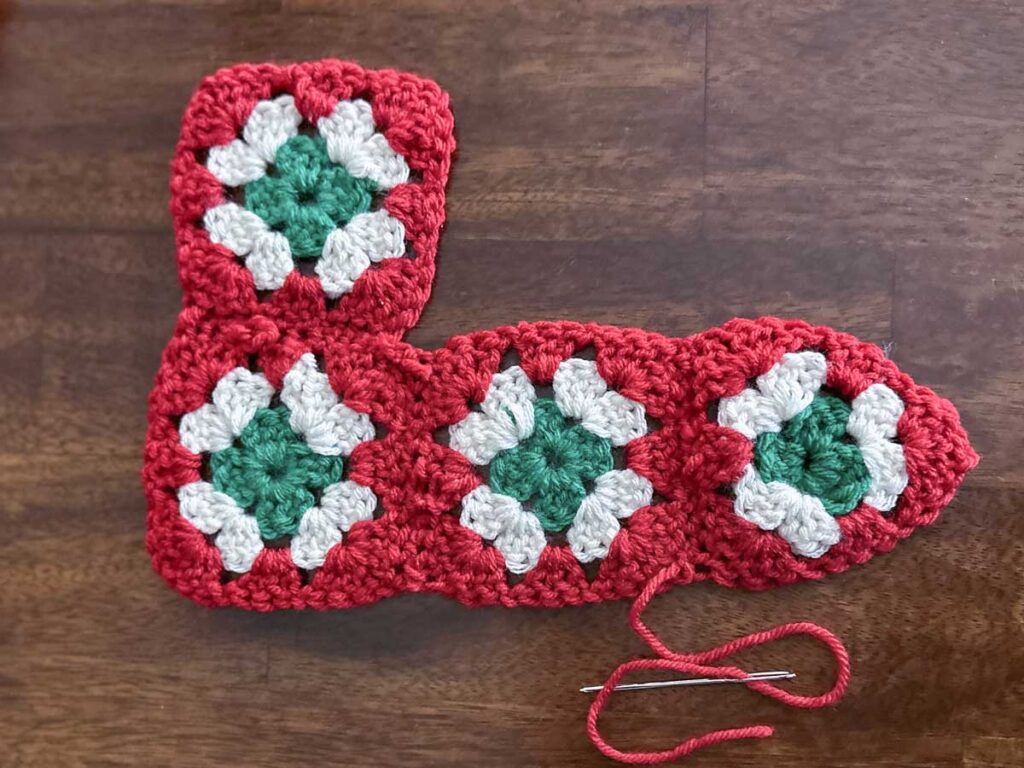
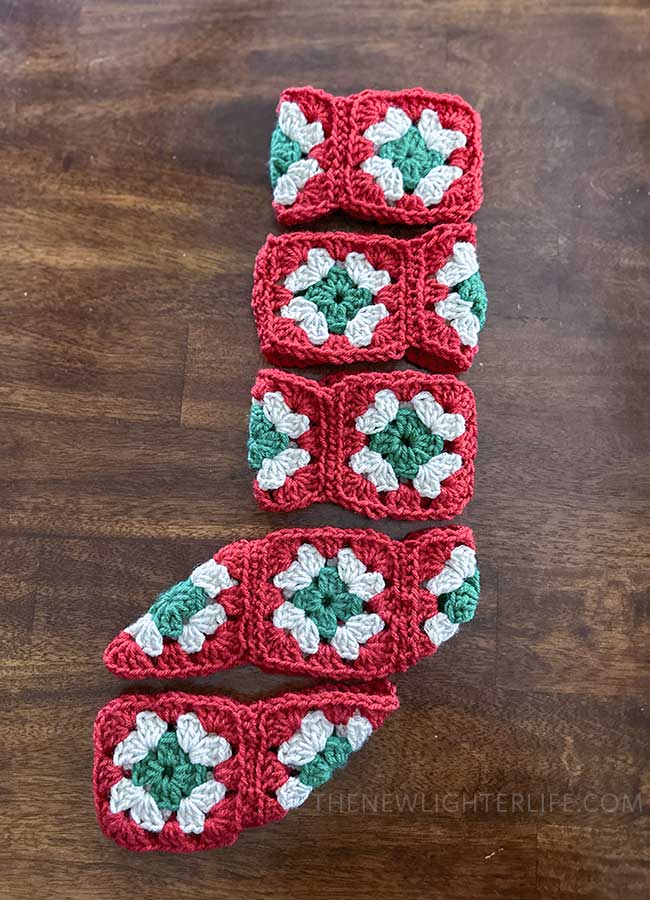
Whichever option you choose to join the blocks, the simplest way to achieve the stocking shape is by attaching the blocks in four (4) 3-block strips and one (1) L-shaped strip. The L-shaped strip must have the triangle block on the top, 2 traditional granny squares down, and 1 traditional granny square on the bottom right as pictured below.
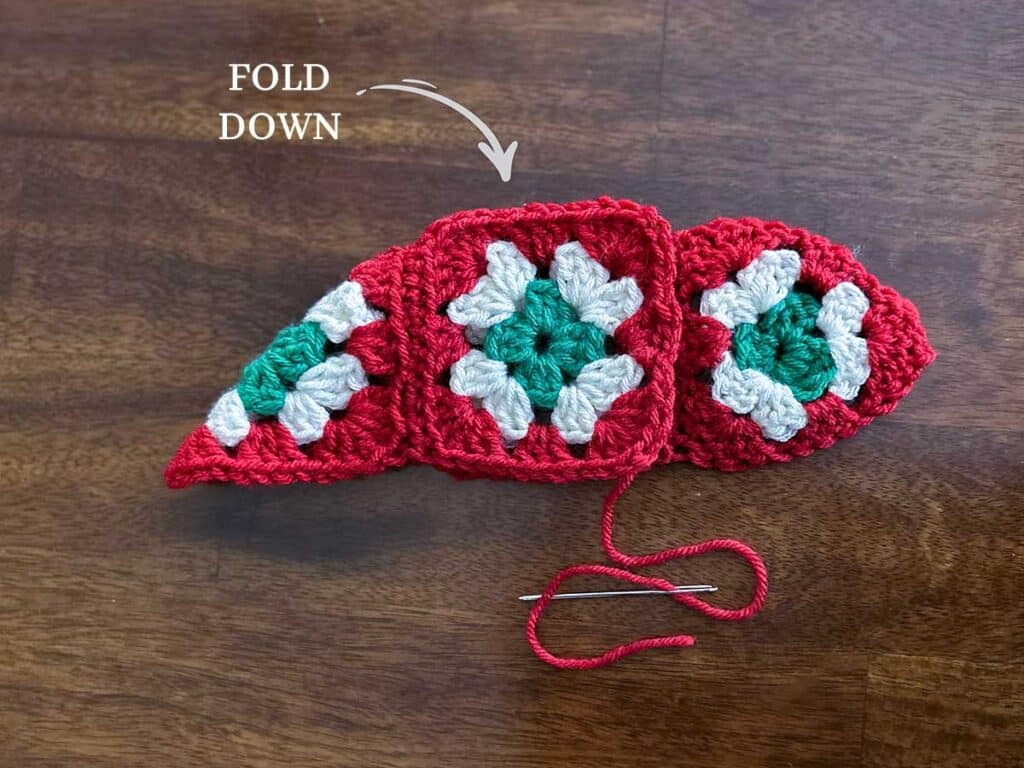
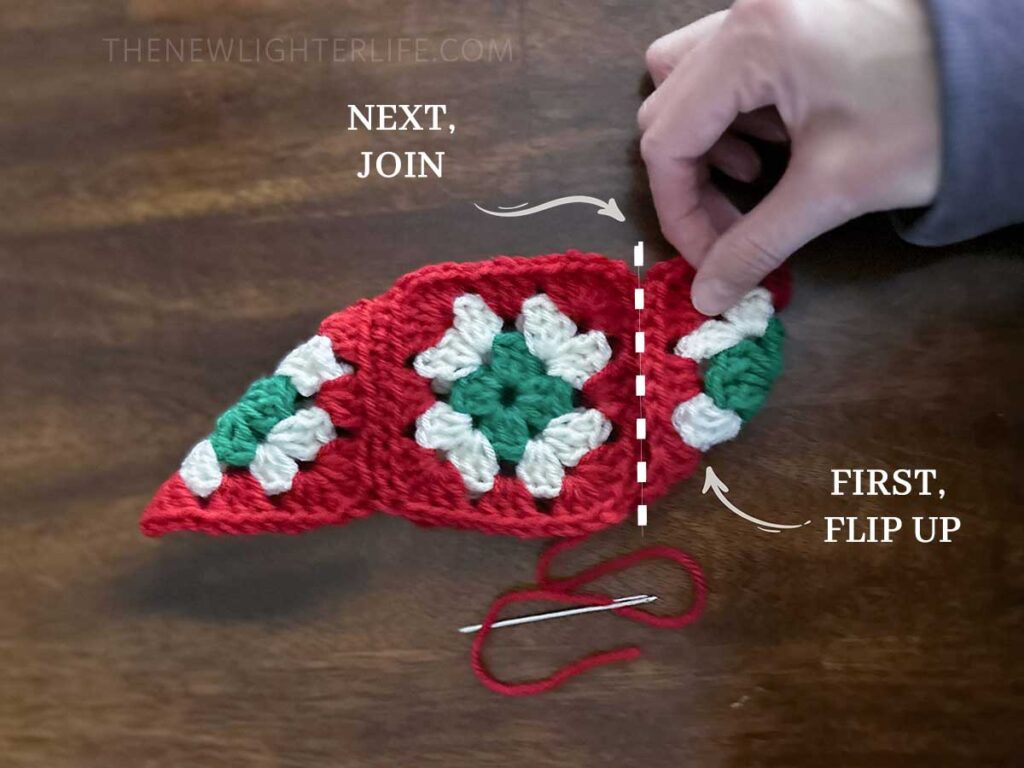
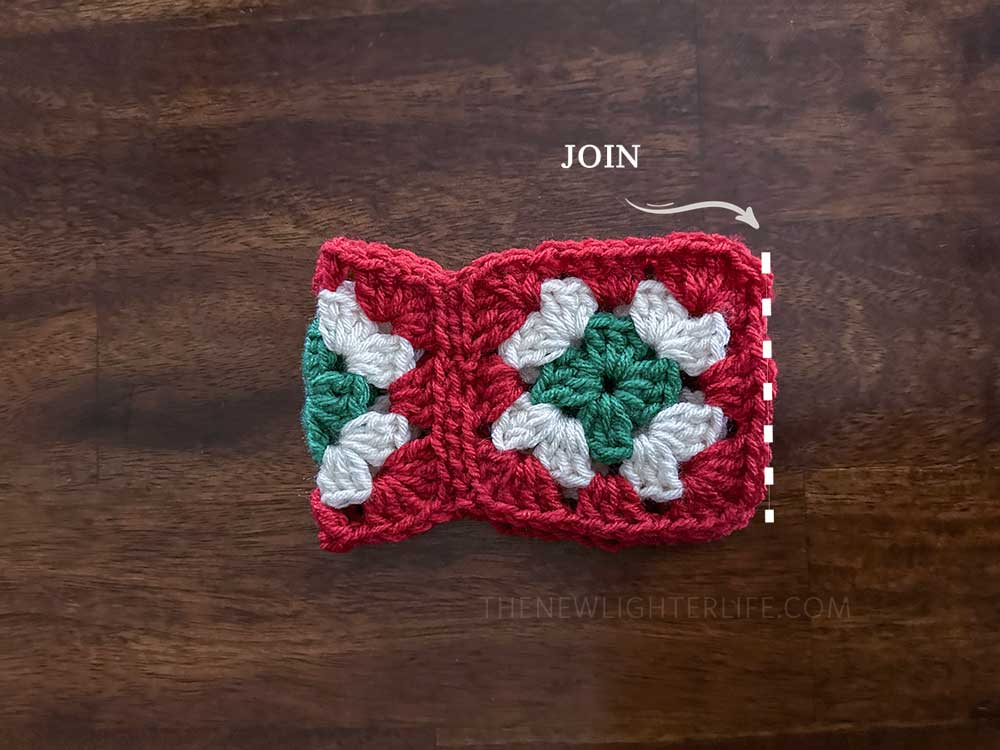
Shape the Toe
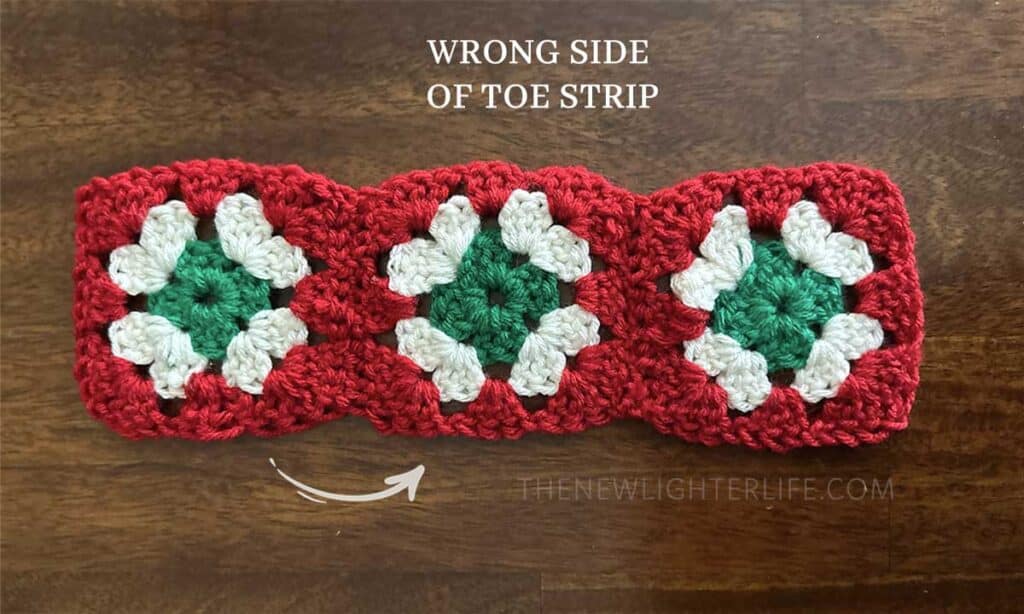
Step 1. Take one 3-block strip and lay it wrong side up.
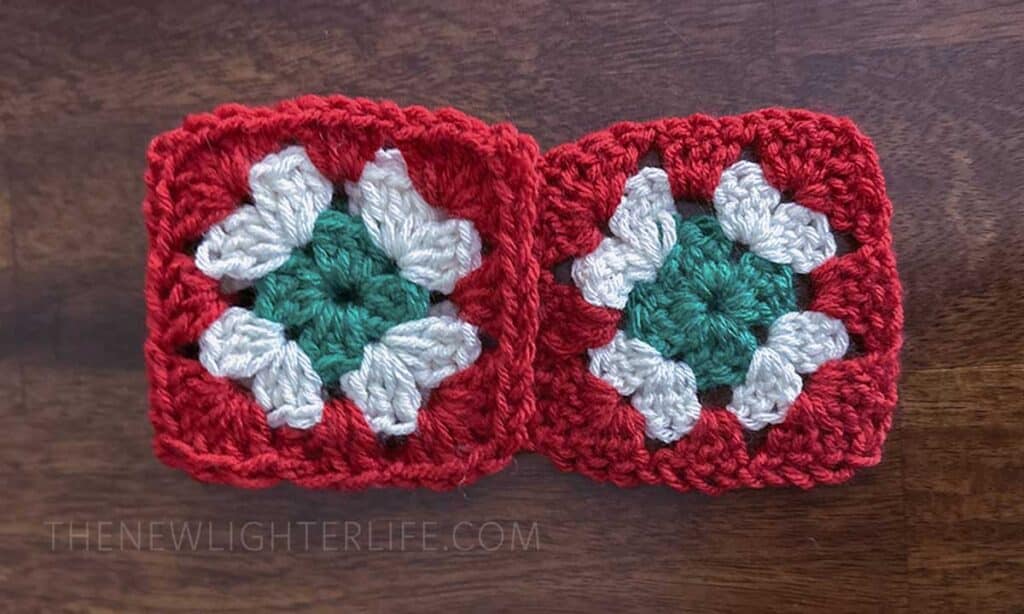
Step 2. Fold the left block over so it is lying directly on top of the middle block and only 2 blocks are visible.
Step 3. With the remaining single-layer block, fold the bottom side so it matches the edge of the block folded in step 2.
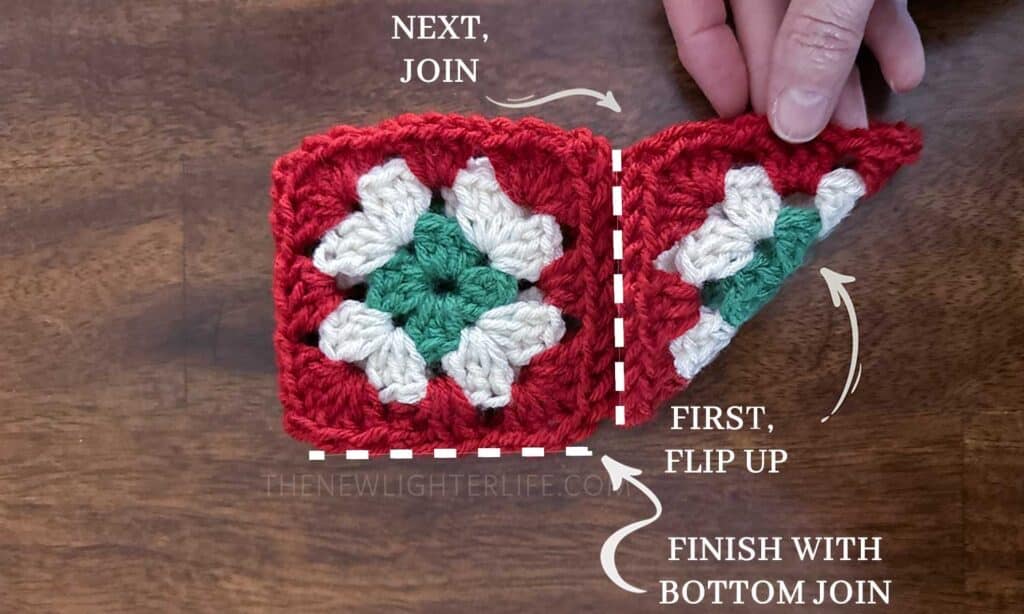
Step 4. Join along the bottom and right edge of the square, as marked above.
Prepare the Heel
Step 1. Take the L-shaped strip and lay it upside down with the triangle block to the bottom right.
Step 2. Fold the top traditional granny square down so it is directly covering the block to the left of the triangle block.
Step 3. Take the triangle block and fold it so the point of that triangle block is aligned with the uppermost edge of the traditional granny square.
Step 4. Join from the triangle point and along the side of the traditional granny square edges as marked above.
Prepare the Leg/Calf Strips
Step 1. Take the remaining three 3-block strips and join them so they form a circle.
Piecing It All Together
It’s time to join all your strips together to form the stocking. Use the same joining method that you selected to join your blocks and join your strips according to the image below.
Top Edge Finish
With a slip knot, beginning on the back seam at the top of the stocking, insert your crochet hook and ch-3, followed by dc in each stitch around the edge of the uppermost leg/calf strip until you reach the stitch just before your ch-3. Slst to the 3rd chain of that ch-3.
Make a Hook Loop
Ch-15 from that last slst from finishing the top edge. Slst to the 3rd chain of the top edge’s ch-3. Clip your yarn leaving about a 2-inch tail, knot, apply a small dab of fabric glue, and weave ends.
Conclusion to Making a Crochet Christmas Stocking
That’s a doozy of a post friends! I think you’ll agree that this granny square crochet Christmas stocking pattern combines the timeless charm of traditional holiday decorations with the warmth of a handmade heirloom. By following my step-by-step instructions, you can create beautiful and personalized stockings that will add a touch of nostalgia to your holiday season.
Whether you’re an experienced crocheter or just starting out, this project is the perfect one to express your festive spirit and make cherished memories. So, gather your yarn and hook, and spread your joy and love with every stitch.
Wishing you a cozy and memorable holiday season filled with the love and creativity that handmade gifts bring to our lives. Happy crocheting!


Hi, I love this pattern. I am having trouble with assembling the heel and toe. Step by step pictures would be appreciated.
Thank you
Hi Christine, I finally got a video put up so you see how to assemble it. You can view the video in the post or you by going to, https://youtu.be/G3Lo2jSma7E. Hope it’s helpful for you!
Can’t wait to make these! Thanks! 🙂
how can i print pattern
Hi Madge, I haven’t had time to put this together as a printable pdf but it’s on my list.
Crocheted all the squares sewed then like you said. Can’t understand the directions for putting the heel and toe together at all no matter what I try I do not get the triangle shape. Disappointed!!
Hi Vanna, I finally got a video put up so you can see how to put it all together. You can view the video in this post or by going to, https://youtu.be/G3Lo2jSma7E. Hope this helps!
Thank you for sharing these instructions. I had trouble printing.
I made these years ago but lost the pattern.
Thank you.
Thank you, Sarah. I haven’t had time to put this together as a printable pdf but it’s on my list.
I’m normally a knitter, so for my three boys I knit them stockings, but I told myself that if I ever have a girl that I would make this to match the one that I have from my childhood. Well, I finally got a chance to try this pattern out. I love it and I found your instructions very clear. The only thing I did differently is the heel. Instead of sewing a square to shape, I actually created a granny triangle using the same technique as the square only with three center clusters instead of four. It worked perfectly, and matched up with the squares just fine.
Thank you for sharing this pattern! It is incredibly easy and turns out great.
Thank you so much, Jamie! I am planning on stockpiling some stockings for future grandchildren that may come along and will incorporate the granny triangle instead of sewing the heel.
Blessings!
Your stockings are awesome! I am planning on making one for all of my family members for next Christmas. One of my sisters likes the one that you originally made. I was wondering if you still had that pattern, or could point me in the right direction?
Thank you
Hi Erin,
I’m so glad you like the stockings!
For the original one I made, I’ve been digging through my bookmarks and Evernote and came up short on the saved pattern. However, I’m pretty sure this is the same one,
. The stocking I made was hexagons as well and it looks like it’s finished the same way. Hope your sister enjoys it!
Thank you so much for this pattern! My parents had stocking that were almost identical to these while I was growing up, made by my grandmother. Needless to say, they bring a real nostalgic feel to my holiday and I am now working on my third stocking! I love them! Thank you!
Yay! This makes my heart happy!! You’re so welcome!