2 years ago, we were looking at buying a used pop-up camper.
No, we weren’t going to live in it…though we may just do that someday. I put almost nothing past us!
We looked at older pop-ups, and the price was right.
One thing we noticed about almost every older pop-up camper was that they all had ugly, dirty, and tired upholstery.
With zero hesitation, I told Mark that I could recover them. “It will be easy!!” He wasn’t sold. But I’m sure I told him dozens of times and with complete confidence, I could absolutely and professionally redo the upholstery. Up until now, I haven’t had to prove my ability to reupholster camper cushions.
Fast forward to buying this Winnie. Once again, Mrs. Confident reared her ugly head. I said I could do it. “It will be easy!!”
Only this time, we both wanted it done. So I did what any person with zero experience recovering cushions would do. I bought a bunch of fabric without taking any measurements and set to deconstruct the existing cushions. – maybe you can see where I’m going here.
I got about 1/32th through taking the cushion cover apart and I realized it was no fun. I also had to make 2 more trips to the fabric store to get the additional fabric that I needed after I actually measured the cushions.
Here is the best before and after I have of the booth.
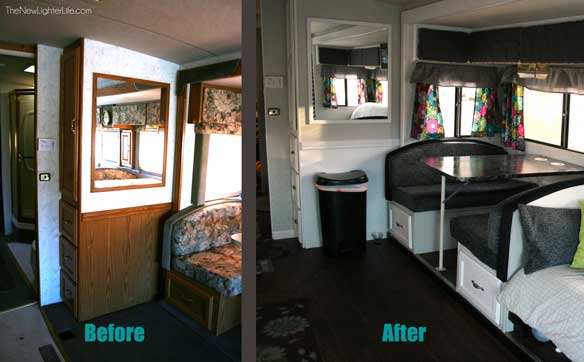
And here…

What a stinky picture, but I’m including it because you can see most of the dinette in it.
Now I’m going to tell you how I did it.
1. Measure
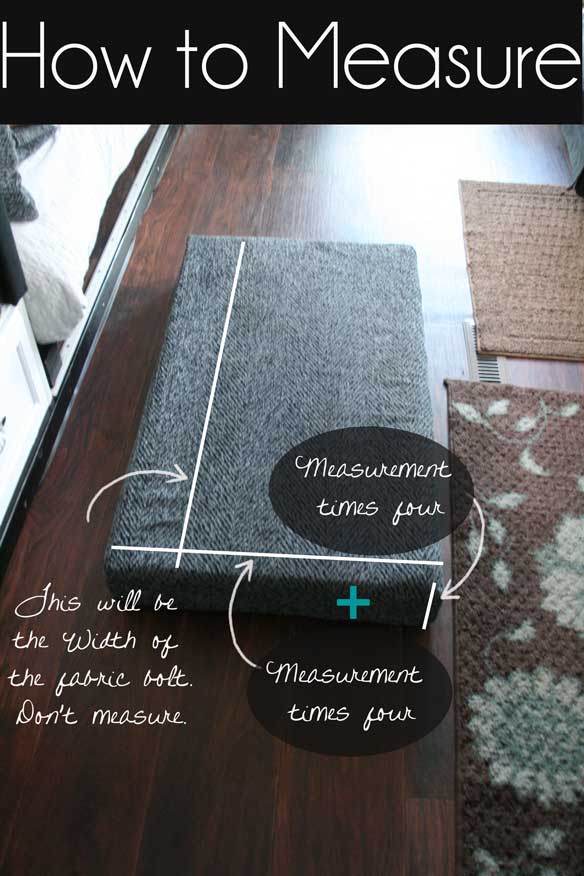
The first thing to do is to measure the width of your cushion. I’m hard-headed which is why I did not do this right away. Save yourself the headache and extra trips to the fabric store. Measure.
NOTE: Upholstery fabric comes in 54″ widths so it’s not necessary for you to measure the length of the cushion. A fabric bolt width will more than cover that length.
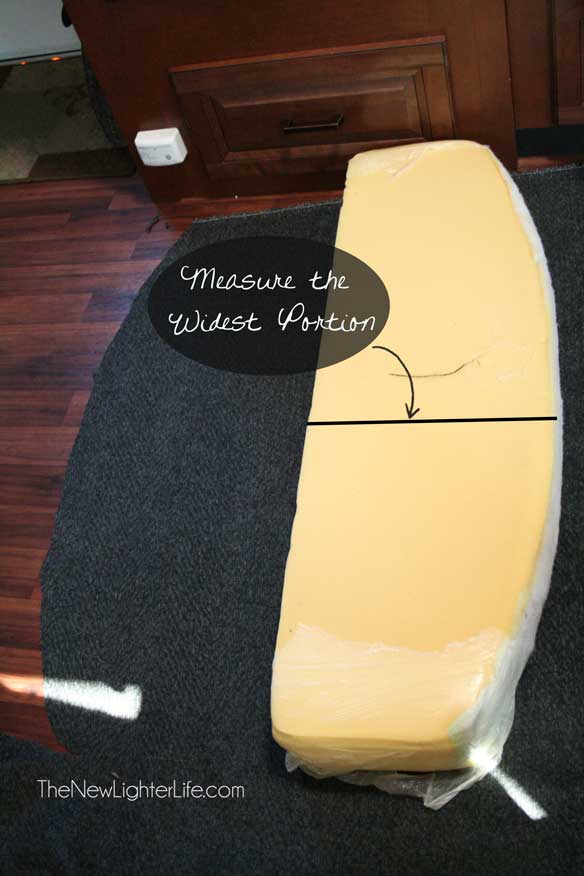
My cushion width measured 23 1/2″ for the seat part and 14″ for the widest portion of the back part. The depth of all the cushions was 4″.
Below is a view of the seat cushion measurement:
Below is a view of the back cushion measurement:
So here is a breakdown of the measurements of my cushion.
Bottom Seat Cushion
23.5″ – length
4″ – depth
23.5″ – length
4″ – depth
Add this all together and the total is 55 inches of fabric for each bottom seat cushion
You will multiply this by 2 for the two cushions.
Back Seat Cushion
14″ – length
4″ – depth
14″ – length
4″ – depth
Add this all together and the total is 36 inches of fabric for each back seat cushion
You will multiply this by 2 for the two cushions.
End Caps
The next measurement you will need to contend with is the end cap portions. If you have a directional patterned fabric as I did, you will need to get more yardage. My ends are 23 1/2″ X 4″ for the seat part and 9″ X 4″ for the back part.
I had enough to piece the shorter back part end caps from leftover fabric. I needed to buy 4 more inches of fabric for each seat end cap. 2 end caps were cut from one 4″ wide strip of the 54″ bolt.
Now some of you seamstresses might be wondering what about my seam allowances. I found that if I wanted the cover to be snug and not loose, it was better for me to NOT CUT FOR SEAM ALLOWANCES. I sewed a 1/4-inch seam instead of the standard 3/8-inch seam.
So the total amount of fabric I needed for my particular booth was 186 inches which calculate to be about 5 1/4 yards. For safety’s sake, I’d round up to 6 yards.
2. Cut The Fabric
Now for cutting. I decided to use each cushion as a pattern piece. I laid the cushion down on the fabric and cut around it. My fabric was dark but if you have a lighter fabric, you could trace around the cushion and then cut out your fabric.
For the 4-inch widths, I cut them with my rotary cutter.
3. Sew It Up
Now you’re going to sew the pieces together. As I mentioned earlier, I used a 1/4″ seam allowance to have a snug fit. You can always make your seam wider if the cover is loose.
Below is a diagram that will hopefully help you see what I did.
The first is the back part of the dinette. Mine was curved and not as angular as the diagram.
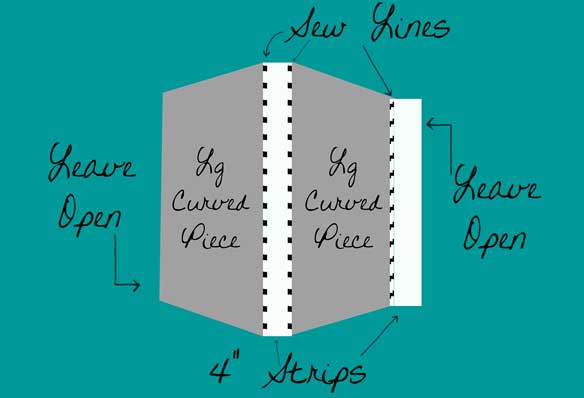
This is the seat part of the cushion. Same basic instructions as the one above.
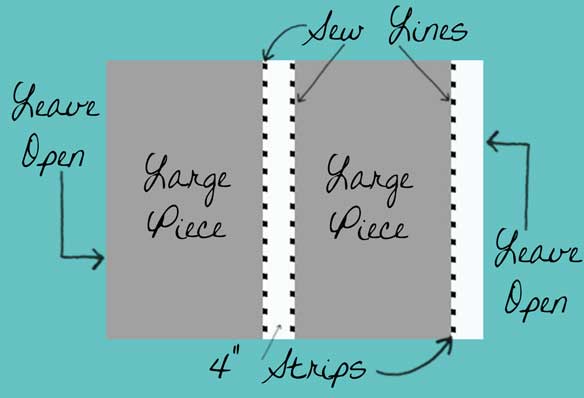
Just make sure you don’t sew them all together to make one continuous piece of fabric. You need to leave the 2 end sides open, so you can put a zipper in. You are most definitely going to want to put a zipper in the cushion.
Did I say zipper??
Now don’t abandon me yet! Before this project, I had never sewn a zipper. Ever. I was actually pretty terrified of zippers. Irrational fears of zippers, that’s a new one.
Because of my phobia, I tried to use Velcro on one of the cushions. It didn’t work very well. I found that the velcro puckered and was bunchy. I decided to repurpose the zippers that were on the original cushions.
I busted out my seam ripper and took out the velcro.
And true to my way of doing things I’ve never done before, I barrelled ahead without watching a single video or tutorial on how to install a zipper. Some of us have to learn the hard way.
If you’re the video DIY kinda person, here’s a great one for you to watch.
As good as this video is, I found that some of her steps were unnecessary, which is probably due to this project not being for clothing. I didn’t use tape. I didn’t baste anything. I just kinda winged it.
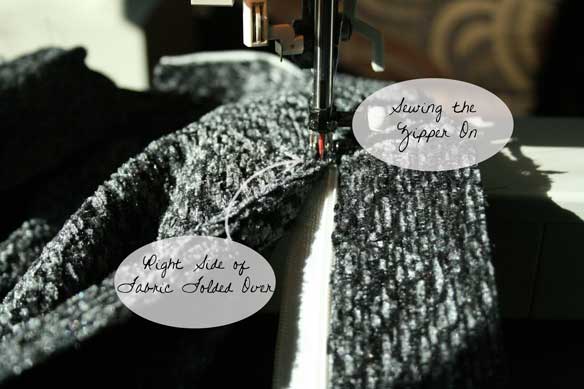
I simply tucked the seam allowance under and topstitched the zipper on with my zipper foot. It worked great and I had no problems with it.
You can see below, the right side of the fabric is on top and the seam is tucked under. I ran the zipper along and kept everything aligned.
For my second zipper, I switched it up.
For this one, I turned the zipper upside down and didn’t tuck under the seam allowance. Instead, I sewed along the zipper and when fully open, the seam allowance and edges were clean and neat.
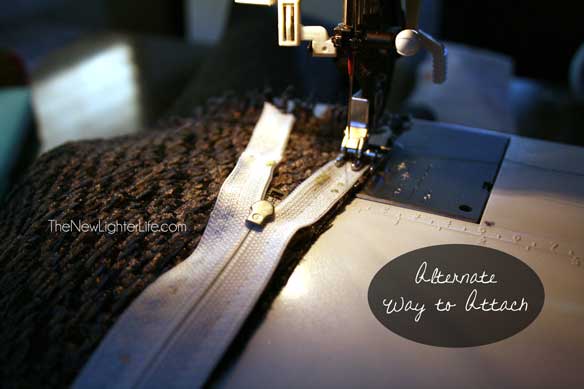
Both ways worked wonderfully and I was very happy with the results!
Just know that I didn’t follow a bunch of fussy steps. It really was so easy. And since I wasn’t sewing a dress, I think the zipper is pretty forgiving.
One last thing about the upholstery zipper. Mine had a fabric stop sewn in for both ends of the zipper instead of built-in metal stops. I had to zig-zag stitch fabric stops onto both ends of my zipper so that my pull didn’t slide off all the way or split open at the beginning.
Yes, foolishly, I tried to zip and unzip without the stops.
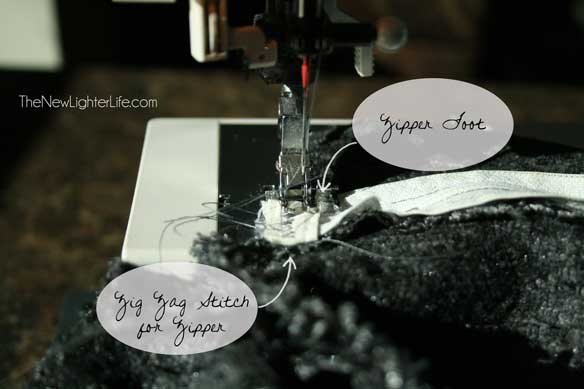
And here is a view of the completed zipper on one of the cushions.
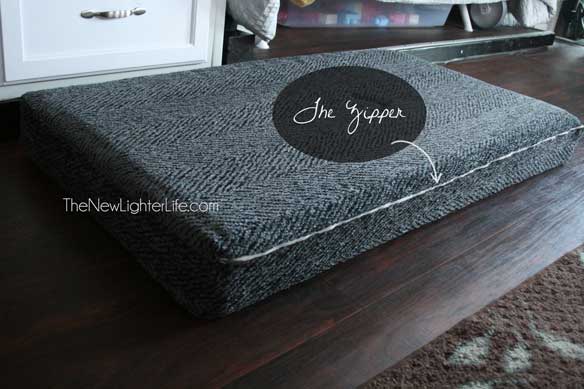
The last thing you need to sew on is your end cap pieces since you now have 4 large tubes with the zippers sewn in.
Keep the tubes’ wrong side out and then pin the end cap pieces to them with the right sides together. Simple sew all the way around the rectangular end caps to complete your cushion cover.
Once you’re done, unzip your cushion cover if needed and turn it right side out.
All that is left to do is for you to squeeze your cushions into your covers and zip them up.
If the fabric is a little loose, it’s no big deal. Just take the cushion cover off, turn it wrong side out, and sew a little wider seam throughout. The cushion is very forgiving if your sewing is not-so-perfect.
4. Recover the Trim
We decided to contrast our trim pieces with black fabric.
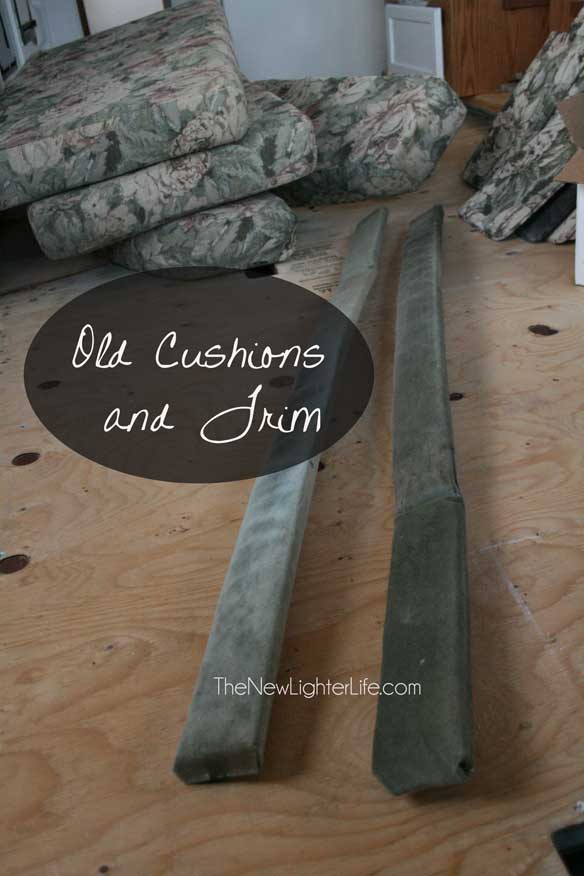
It is very simple and easy to do and involves no sewing.
All we had to do was unscrew our trim pieces and recover with our new fabric.
I didn’t even bother taking off the old worn upholstery, I just laid the trim on the new fabric, cut, and stapled it.
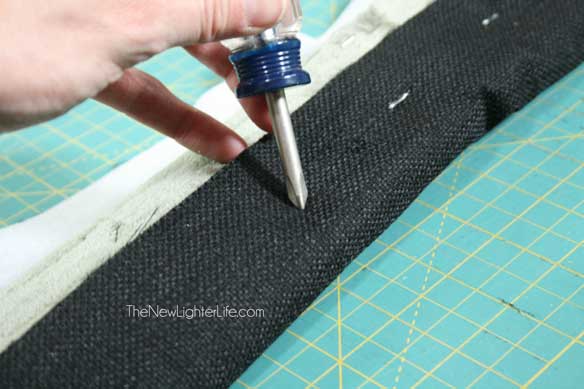
As I went along I punctured holes where we would need to reattach the hardware for the actual bench.
Here is a view of the trim pieces and hardware attached to the booth before we recovered them.
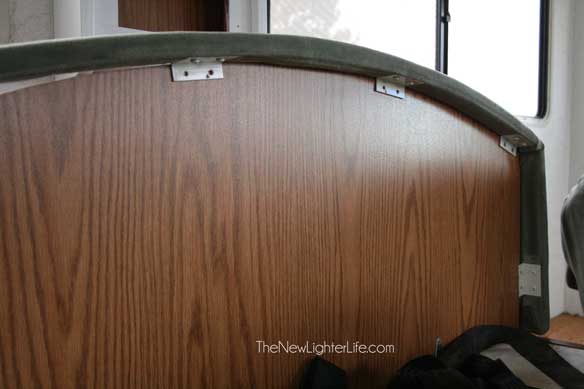
We also painted the fake wood, and table, & replaced the drawer pulls to finish off the dinette area.
And here is the final view of our refinished dinette booth. We simply LOVE this redo!
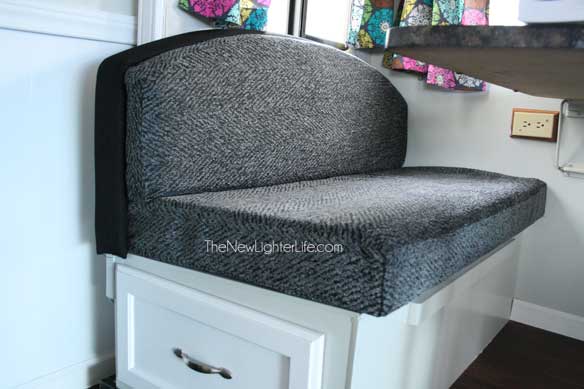
I’ll just close by saying, that underneath my over-confident exterior, I was pretty nervous about doing this project. Trust me though, if I can do it, you can too!
Blessings,
Great idea! Can you tell me what you did with your flooring? It looks as though it is different from the ‘before’ also. We purchased an older Pace Arrow and it needs some TLC. I do like the idea of your white paint. Did you also paint the walls? You must have taken down all the window trim also? Do you have other pictures of your before and after in your rig? Would love to see them and what you did.
My husband laid down sheet vinyl on the floor. It was a PERFECT option! 🙂 We did paint and it made such a difference. All the pictures I’ve posted are what we have. (other pictures are bad angles or lighting) 🙂
Got a 94 Winnebago and the dinette is the same..got to go. So using your instructions I’m off to the fabric store. Thanks for the tutorial. 🙂
I am so glad I found this tutorial. I have been wanting to reupholster our camper cushions for a year now. This looks pretty doable so I measured my cushions and bought the material last night? I am going to attempt starting it as soon as I get through typing this! Hope all goes well. Thanks!
Hope it went well for you Erin!!
Hi Julie,
Thanks for your ideas! I am re-doing some cushions… and I love that fabric… where did you get it?
I purchased it from Hancock Fabrics. It was a clearance fabric so it’d be next to impossible to find. :/ Sorry!
Hi thanks for posting this we just bought a used RV and I hate the fabric in there. So this gives me some great ideas. I was also wondering when you painted in there was that over RV wallpaper and if so how did that go. Did you have to remove the wallpaper and paint wood? Thanks in advance.
Hi Cija! This is the post I wrote about how we painted our cabinets, https://thenewlighterlife.com/how-we-painted-our-cabinets-without-fuss/. For the walls, we didn’t remove the paint, just washed them with TSP (you can buy it at any home improvement store) a coat of primer, and regular paint. We didn’t have wallpaper on our walls, it was more like pressed board. Hope this helps.
BTW – the painting went off without a hitch!
I have a jackknife couch that I want to reupholster. Any suggestions on what type of material to use. Also what is the easiest way to measure to determine how much fabric is needed
I’m so sorry Trisha…I’ve never attempted it so I can’t say but I know I’d be googling like crazy if I were in your shoes.
OR you could look for a good couch cover that was stretchy would be a good solution for you. Like this one, here.
Thank you for making this tutorial, it’s the first I have found with the dinette bench cushions rounded on top! I’m about to tackle ours and try a no sew method with industrial Velcro.. Hopefully they turn out well.
Hope it works for you Samantha! I’d probably try to cover it without taking off the old fabric just to make sure it works.
That was the photo of my Holiday Rambler dinette.
I the entire thing and purchased 4 stackable black chairs from Ikea. So much mor comfortable. ripped up the carpet and laid linoleum looks like 6′ wide planks. so easy, I did it myself.
I love that option Diana!!! Way to go!
Thank you for your tutorial, I think I have the exact upholstery. I am getting ready to use your tips to redo the booth. Did you change the sofa or recover it. Also did you change the carpet in the cab of the Winnie. Mine is the ugly blue color but even if we change the floor in the living area I didn’t know what to do with the cab. Thanks for your thoughts.
Hi Carol! We didn’t reupholster the cab or replace the carpeting. I think the carpeting would be doable but we ran out of steam. Sorry to not be of more help~
I’m getting ready to cover the dinette cushions…my problem is how did you cover the couch? Trying to figure out an easy way?? I need help!!!