I’ve had quite a few updates to my cookbook over the past year so decided it was high time to reprint. Getting the print settings can be challenging, to say the least. So today I’m breaking down settings to print a cookbook as a booklet.
Before I get to that, I have a series of blog posts I’ve written over the past year or so that delve into how to create, bind, and print a family cookbook. A full list of the posts I’ve published regarding cookbook creation is below:
-
- Creating a Microsoft Word Cookbook Template
- The 4 Affordable Binding Options for your Cookbook
- Three FREE Printable Cookbook Covers
- Categories for Cookbooks
- Updates to the Table of Contents with Fields
- Creating a Cookbook Index
- Adding Images to Your Cookbook Template
- FREE Cookbook Category Divider Pages & Cover
In reading those posts, you may have noticed that I didn’t include instructions on printing the cookbook at home. By the time I published those posts, I had forgotten the settings on my printer and I was struggling to get my cookbook to print properly.
Professional Printing
In the past, the cookbooks I’ve created for family and my church have always been printed by professionals (such as Office Depot, Staples, etc.). They always got the print settings right. I had NO idea the settings were so finicky. I guess they made it seem so easy because printing is their actual job. Ha!
Since I switched over to using binding rings for binding, I now have the convenience of being able to update, print, and bind my personal family cookbook at home. The downside of this convenience is that the settings to print a cookbook as a booklet are not exactly intuitive. With no professional printer to help, it can be a big pain after all the hard work creating a cookbook.
Simplified Home Printer Settings
I figured that all you wonderful cookbook makers could use some tips and hopefully save time printing. So the other day, I took several hours (yes, that is not a typo…it took me several hours) testing all the various print settings and combinations of those settings.
What a pain!
If you could have seen my chart and scribblings, I didn’t think I’d ever get it to print correctly.
But today, I’m THRILLED to report that I have the settings PERFECT!
Systems Used For Printing
Before we get into the settings, I need to tell you what operating system and printer I’m using in case you need to adjust slightly. If there are slight differences in what you see when you print, it may be attributed to the systems/hardware I’m using. Below are the details of my system:
Computer: Apple iMac, OS Catalina
Printer: HP OfficeJet Pro 8720
Software: Microsoft Word for Mac (2019 License)
Setup Tips
Please keep the following tips in mind when you are finalizing your document.
- Do NOT insert a black page at the front of the document. You may be tempted to do this to get the cookbook to layout correctly for cutting. Microsoft Word does this automatically when you print a booklet.
- Every page at the start of a cookbook section needs to be on the odd page of the document. This is VERY important for assembling your cookbook. You may need to insert a blank page at the end of a cookbook section to make sure your Main Meals start on an odd page.
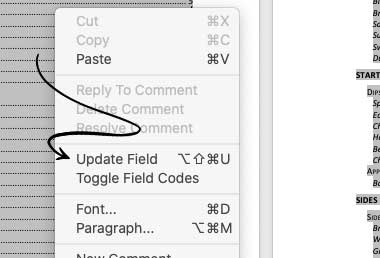
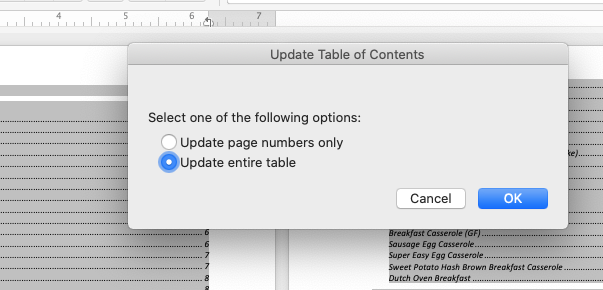
- I highly recommend that if you are using my Microsoft Word Cookbook Template, you update your table just prior to printing. To do so, right-click the table, click “Update Field” and “Update entire table”(see images below).
- Once you have updated your table, double-check to be sure your cookbook sections still start on an odd page.
- I recommend you test print pages 1-4 with the settings I outline below BEFORE you print your entire cookbook. This will help you make sure nothing major is off in your document before you send your whole cookbook. Also NOTE: You cannot simply print the first half of your cookbook and then print the other half due to the way Microsoft Word handles printing a booklet.
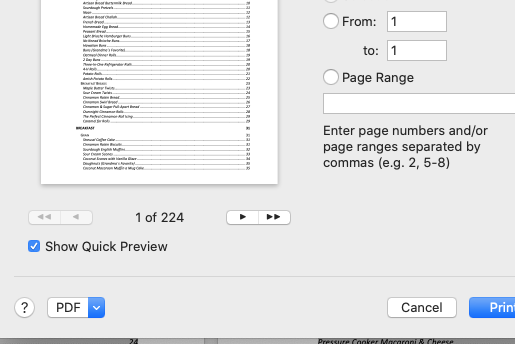
- Preview options are NOT accurate. “Show Quick Preview” displays the image above the page count, (1 of 224 in my image below). This is not an accurate picture of what is going to print even when the settings are correct to print the cookbook.
 If you click the PDF drop-down, you get the following options,
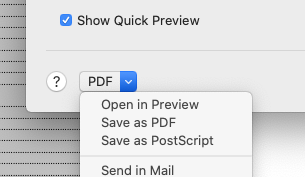
- I do NOT recommend you use any of these options. Trust me, they are not accurate and will only serve to confuse you.
I believe that is it for my big pointers. Now let’s get to the settings to print…
Settings to Print a Cookbook as a Booklet
- While on your print screen, you may want to select black and white, color, greyscale, etc. (see #1 in the image below).
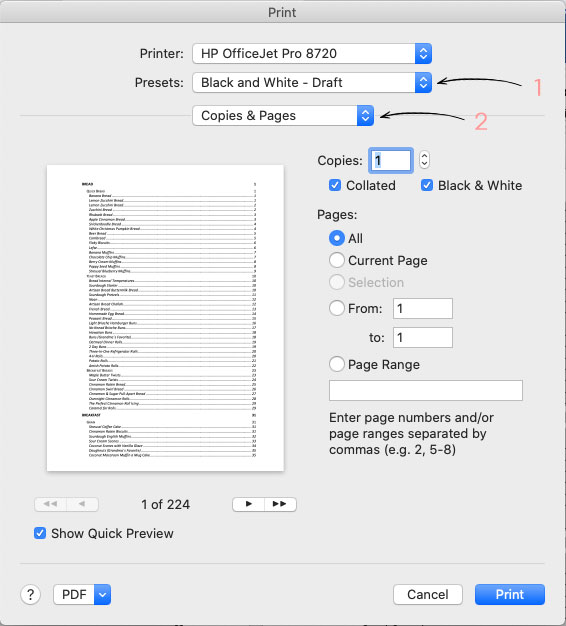 Next, select the Copies & Pages drop-down, (see #2 in the image above).
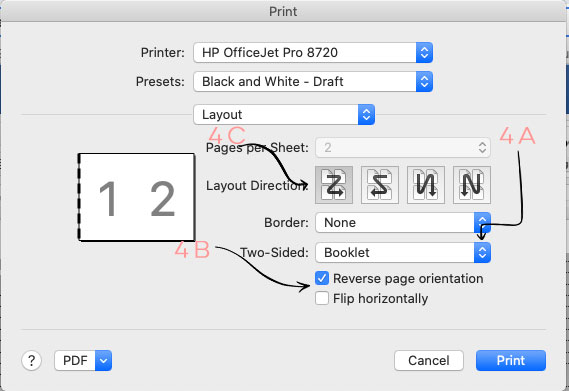
- Select Layout from the dropdown.
- Change settings in the order listed and noted in the image below, (#4A, #4B, & #4C).
- Click “Print”
That’s it!! It is actually EXTREMELY simple to print a booklet as you can see. The PDF and preview options are VERY confusing and convoluted the process.
If you have problems, please read the Setup Tips section above. I sincerely hope this saves you a ton of time and that the settings to print a cookbook as a booklet are clear and easy to follow.
Once everything is printed, you just need to cut your pages and bind them.
I will be sharing a printable cookbook cover for you in the next week or two so subscribe to be notified of that posting and be on the lookout in your inbox.
Blessings!
As an Amazon Associate, I earn from qualifying purchases at no extra cost to you. Thank you for your support!

6 thoughts on “Easy Settings to Print a Cookbook as a Booklet”