Once again, we’re revisiting the skirting.

You’ll remember we were having some issues, but today’s post is a very positive one.
I’ll admit, after I got the email back from EZ Snap Direct I was skeptical. The recommendations they made didn’t seem like they’d make THAT big of a difference.
Still, we decided to do everything they suggested since we needed to figure it out and didn’t want to waste any more money.
Our Fixes
Additional Snaps. Mark attached the additional snaps we ordered to make sure they were spaced closer. We allowed them to cure for a few days (much longer than recommended by the manufacturer).
5th Wheel Enclosure. We removed this area of the skirting and ran some more vinyl to keep the main living area skirted. It’s been relatively warm up in that room, even on days when it was near zero.
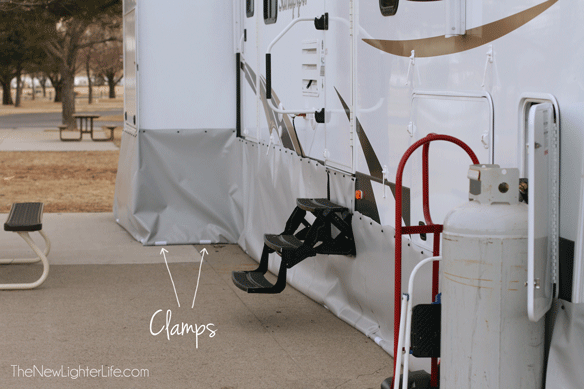
PVC Pipe Clamp System. When we ordered our additional snaps, we also purchased PVC pipe clamps. Mark bought the PVC pipes from Menards and cut them in lengths to follow the skirting. The skirting is attached to the PVC pipes by wrapping the bottom side of the vinyl around the pipe and using the clamps we purchased from EZ Snap Direct to clamp the vinyl to the pipe.
You do have an option of using corner connectors to keep the skirting even more neat and tidy, but we have not done that as of this posting.
Our workout weights and sand bags are laying just behind the PVC pipes on the inside. This setup is to cut down on any excessive flapping and to keep the skirting from moving too much.
How Has it Worked?
Since the changes were implimented, we’ve had some days that were pretty windy.
The skirting not only stayed up, but was also much quieter in the camper. And YES, there wasn’t any flapping. It is a whole new world I’m telling you!
Are we happy with the update? You bet we are! It’s so much better and fuss-free since using the PVC and pipe clamps, which I think was the most significant thing that we did.
Next, we’ll let you know how you can save money on skirting and what we’d have done from the start if we could have a do over.

Thanks for sharing your skirting adventures! We spent that same winter in Eastern Oregon and actually ended up building the insulated foam siding around our 38′ fifth wheel (we did not skirt the hitch area). We did not use any kind of plywood framing, just the foam boards, and we used duct tape of all things to attach it, which left a huge mess behind once we took it off that we will need to scrape off. But they worked great for the most part and were inexpensive, just labor intensive up front to get it right. Access door by the hookups, and buckets filled with water underneath as weights (so we could take them with us when done). Only changes we would have made was different tape attaching them, and plywood framing to beat the extreme wind. But we have decided never to winter like that again if we can avoid it, so south we go this winter!
Glad you guys were able to figure out a good option, too bad about the cleanup though. Winter-RVing is no joke. 🙂 We decided we never want to RV in the winter again. LOL!
It’s so true, we will never do it again if we can avoid it! And like you, we have kids, pets, and our crazy selves, all stuck inside during horrible winter conditions where the wind blows so hard not even your dog wants to pee. I think one time was enough of an adventure. I will, however, be using your previous posts about EZSnap for reference as we consider under skirting for covering storage and “hiding” things under our trailer. Thank you!
Your write-up is truly informative. More than that, it??s engaging, compelling and we-enwrittll. I would desire to see even a lot more of these types of fantastic writing.