I don’t know about you, but my kids refuse to use a flat sheet. I’ve tried off and on since they were about 2, but the flat sheet always ended up wedged to the foot end of the bed. So we only use a fitted sheet for their beds.
Kids will be kids. It’s always nice to have an extra sheet or 3. Today I’m going to share with you how I sew my own fitted sheets from a flat (or a piece of fabric).
This really came in handy when we made the custom bunks for the Winnie. Since all 4 beds were odd sizes, I needed to custom fit all the sheets or deal with tucking lots of extra fabric under. I hate tucking and readjusting sheets. A mama’s got enough to do in my humble opinion.
Back to my fitted sheets…
My big kid’s mattress tops measure 27″ X 57″. The mattress thickness is 4 inches. You need to know all these measurements specifically for your own bed to fit the sheets properly. I don’t want to get hate mail because you followed my measurements. That and I doubt anyone has the same size bunks that we do. We like to be different.
But given my bed size example, here is how you figure out the size of your fitted sheet.
Width of Sheet
27 (width of the mattress)
8 (thickness of the mattress multiplied by 2)
+ 4 (for hem and overhang )
39 inches
Length of Sheet
57 (length of mattress)
8 (thickness of mattress multiplied by 2)
+ 4 (for hem and overhang)
69 inches
So you’ll want to take fabric or cut your sheets to the measurement that you find you need for your particular bed.
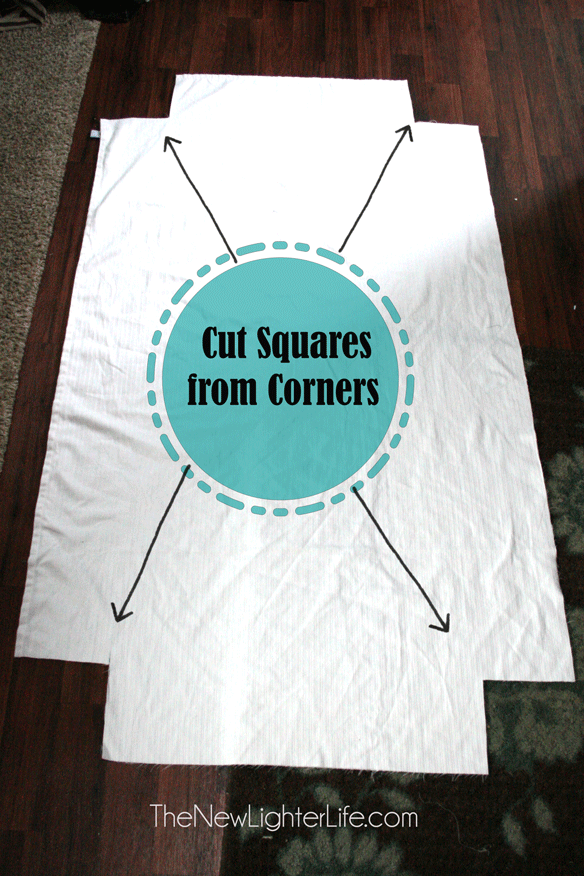
Cut Out Corners
Next you need to cut out notches so you can make your corners. As I said, I have a 4 inch thick mattress and I have allowed for 2 extra inches on each side for the hem and under tuck (if that’s a word). So I cut out a 6 inch square from each of the 4 corners of the piece of fabric.
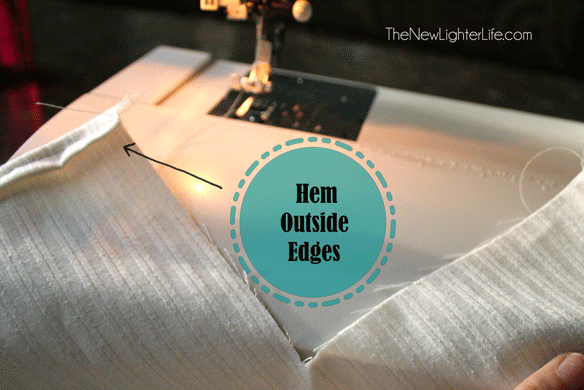
Time to Hem
Now is the easiest time to hem your sheet. I tend to sew like a madwoman and go as fast as my machine will allow. I don’t want to have to fuss with any corners which is why I recommend sewing the corners together AFTER you have hemmed the edges.
I fold over my hem 1/4″ and then another 1/4″ and sew along the edge. I loathe pinning and have a dislike for the iron so I just do this turning under by hand as I go along with the sewing machine. It doesn’t need to be perfect.
Sew the Corners
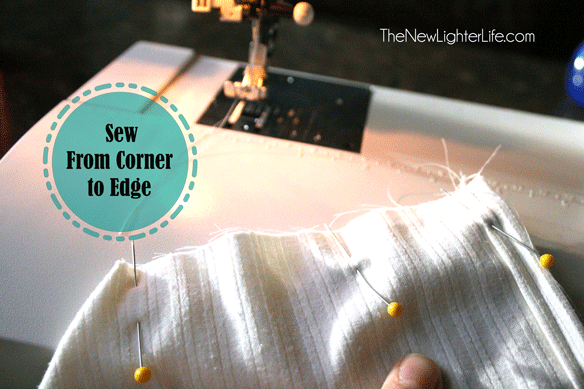
Corners need to be sewed together next. Simply line those cut out corners that are missing the 6″ squares and sew a 1/4″ seam from the point down to the edge. Now you have a nifty corner for your sheet.

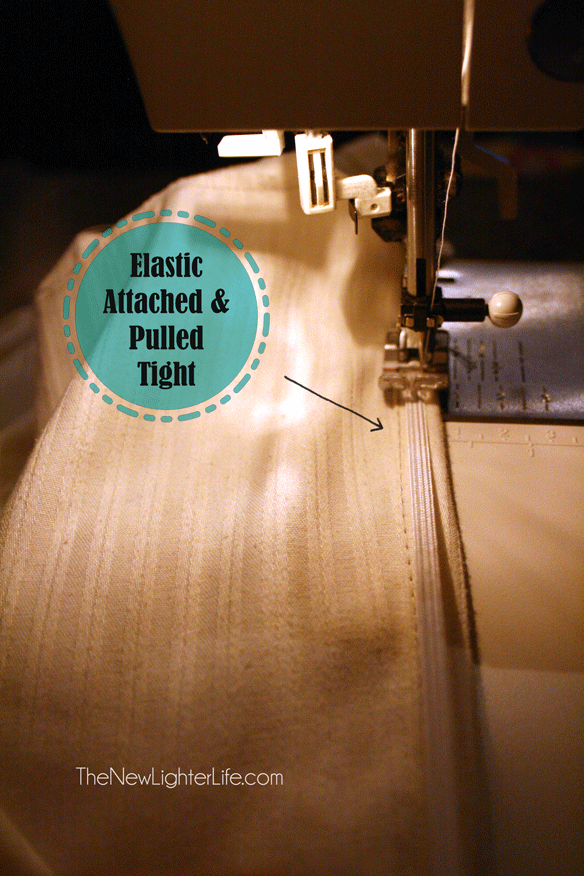
Attaching Elastic
In order to get the sheet to fit around your mattress, you need to attach elastic to the edge.
On the top of the sheet, I start on the left side about 8 or 9 inches from my corner seam and zig sag stitch a 1/4″ piece of elastic to the edge. Once I’ve got the elastic attached with a couple of stitches at the beginning, I pull that elastic VERY tight as I let the machine pull the hem of the sheet through. You just want the elastic pulled tight so it will scrunch the fabric and give you fitted corners.
I do the top of the sheet as one big strip and finish about 8 or 9 inches on the other side of the right corner.
And that is it. So easy and it makes making beds a breeze.
I’d estimate that one sheet takes less than 10 minutes to sew custom fitted sheets from start to finish. Worth the time in my book!
As an Amazon Associate, I earn from qualifying purchases at no extra cost to you. Thank you for your support!

Oh, how funny–I thought my kids were the only ones that hate flat sheets! 🙂 Love this; definitely will “Pin it.” (BTW, I took your advice to try Pinterest, & I’m so glad I did. 🙂 )
Yay! You’re on Pinterest! I’ll have to look for you!
I don’t cut out the corners as it tends to lead t fraying, just stitch the marked out squares on the inside of the sheet to make a triangle, flat against the sheet.
For cots I made fitted sheets that slotted over the entire matress and folded over and poppered shut at one end, so they could be pulled on and would not dislodge however wriggly the baby.
Hi bookmooch,
We’ve washed our fitted sheets plenty over the years and haven’t had fraying. Before making the sheets for the RV, I made fitted crib sheets. I love your idea for making a secured sheet for baby!
I always use French corners when making crib or change table sheets. Now that my grandsons are older, I will do the same for their twin beds.
No corners fraying, and the finish is awesome looking.
For a neat finish, you can also make French seams or pink the allowance on the inside.
Great idea Varia! Thank you for the tip!
I’m going to make the fitted portion at one end of sheet only. We must be restless sleepers because the flat sheet always comes loose at the foot of the bed. The select comfort mattress also contributes to this when raising the mattress at the foot of bed.
Great idea Karen!! I’m sure that’ll work great!
Thank you so much for these instructions. My daughter doesn’t use the fitted sheets either. Because of some special medical needs, I end up changing my daughter’s sheets often. It sure will help being easily able to make good use of that flat sheet that just takes up space in the closet now.
and I Like your sewing instructions. Seems our sewing styles have a lot in common! (Pinning and ironing – bahh humbug)
Ha! Yes, I LOVE shortcuts and if I don’t have to pin or iron – I totally skip those pesky steps! Glad this could help you!
yay! I love you.”It doesn’t have to be perfect” and “I loathe pinning and dislike Ironing” bravo. You are my kind of sewer and mumma. Thanks for the measurements too, other tutes I have looked at have been so wishy washy that I couldn’t make sense of exactly what size to cut my sheet!
We are kindred spirits Kim…I like easy. 🙂 Thank you!!
Hi,
I love this idea but I have a question. My husband put a regular queen size mattress in our 5th wheel which we love, but it’s so big that the top sheet keeps coming on tucked when we raise the bed for storage. I like Jerry Seinfeld am a tucky. I like my sheets tucked in. To much loosey goosey and it drives me nuts at night. So what I as thinking of doing is taking our regular queen size flat sheet and turning it into a 1/2 fitted sheet. Just the bottom fitted to go under the bed. Do you think this would work with an already queen size flat sheet or should I buy a king size flat and do that?
Hahahaha! You are a funny lady Kim! 🙂 I think a queen would work for sure since there is quite enough length for tucking. As long as you don’t fold the top of the sheet down (the part that your pillows rest on) you should be good to go. Hope you get your sheets nice and snug!
Love it!!! Tried another one on Pinterest and had had a horrible time. This one is perfect!
So glad it worked for you Wendy!
Someone gave my son an almost new King mattress, but being on a VERY limited budget, I went to the thrift store, bought a flat King, followed your instructions and WaaaLaaa..one King size fitted sheet. Didn’t have to hem anything..thanks for the instructions!!!
YAY! So glad it worked for you! I love being thrifty!! 🙂
So I’m 23 and as much as I enjoy using laundry I hate having to always wash my sheets! I currently only have two fitted sheets for my new queen sized bed. So I’ve been sewing for a long time (it was the only thing my mom could get me to do to when I was younger with all of my energy) but I’ve never done anything with elastic.
Do you have any more detailed notes for adding the elastic part? Should the zig-zag just go over the elastic or actually puncture it? Also, do you cut a piece or just start at one point and then just pull it tight and sew all the way around and cut at the end? Sorry for so many questions!
Not too many questions. 🙂 The zig zag should actually puncture the elastic. I work with the full length of the elastic and cut it to size when I’m done sewing it on. Hope this helps!
If you wrote an article about life we’d all reach enelghtinment.
Just wanted to say thank you for your instructions. I just made my very first bassinet fitted sheet and I couldn’t be prouder. Your tutorial was awesome!!!
Perfect!! So glad to hear it helped you Kelly!
I love this idea. we have a few sheets and pillows left over from sets when the fitted sheet has ripped. till now I have just replaced the fitted because I didn’t want to waste all the good pieces. but now that I can have a new matching set for our room and the remaining parts of the old sets can be used as back ups for the kids mattresses and have matching pillow cases.
Thanks!
I love using all the sheets that come in sets and YAY for backups! 🙂
Excellent Meagan! So glad you found a way to make them work for your mattresses!!
Julie, the sheet tutorial is amazing. I’m on my second one today and I’m thrilled. One question, may I ask why you sew the elastic on the front side of the fabric instead of on the inside, which wouldn’t be any more time or effort and would give a finished look? Or have you tried that and found topside works better? Just curious. In any case, I’m loving these sheets and thank you so very much. Rachel in Israel
Hi Rachel! I’m so glad you’ve found the post helpful! Honestly…I don’t know why I did that. Ha! Really I don’t, but I agree with you, you certainly could sew it on the inside. I have some sheets to sew up this weekend and I’ll update the post if the inside vs outside doesn’t matter. Thank you for the comment!
Thanks. Your instructions are by far the easiest to follow that I’ve found. We’ve just gotten a camper and need fitted sheets for two odd size beds. I’m off to my sewing machine.
What did I do wrong? Make fitted sheet using a King size flat. Corners are perfect. When I placed on bed, it was WAY TOO SMALL. So I cut out elastic to make SURE I had used a King sheet and it fits great with the elastic. Did I use too much elastic?
Did you measure the depth of the mattress Diana?
Yes, I measured it and added 4. It fits but needs no elastic because it’s so tight. Then I tried another sheet and doubled the depth and added 4 per some other instructions and that came out WAY too small! The depth is 11″ with mattress pad in place.
Why stitch the entire length of the elastic in the corners? Why not just place the elastic in the casing and stitch it at each end? When the elastic gets old and over stretched, it’s a lot easier to replace.
Great tutorial. Thanks for sharing. I wasn’t sure where you begin and end sewing the elastic. It seems to me you don’t go all the way round. Can you help me with this?
I just sewed each corner with a separate strip of elastic (so 4 pieces of elastic).
my husband is a very restless sleeper, flat sheet(top) would always be pulled out of between the mattress, trick: I take the bottom of the flat sheet mark the center with a stick pin, take the fitted bottom sheet mark the center with a stick pin, I pin the top sheet and bottom sheet together at the center pins, start sewing out to the corners less 12″. hurrah, top sheet does not pull out and the bedding stays more made.
I looked at several tutorials for doing this before I made a fitted decorative cover for a daybed. Yours was BY FAR the easiest to follow. Thank you, it turned out great!
So glad it worked for you Teresa!!
I have a question. I have a king flat that i want to make into a queen fitted. Any idea how much elastic i would need? Yard? Feet? Inches? Want to be sure i have enough elastic. Thanks for any replies 🙂
So I’m late responding but I’d suggest 2 yards of elastic.
Sorry but I don’t understand on which edges you sewed the elastic. Was it just the four corners? Or was it all the way around? The way I read it you started top left below the corner and finished top right before the corner, therefor skipping two corners. If that’s correct, why?
Just the 4 corners. You don’t sew all the way around (really you could but it would be a waste of elastic).
Thank you so much for the excellent tutorial. We are expecting our first grandchild this summer and our kids purchased a custom mattress to go in an antique cradle that has been in our family for 150 years. I made a fitted sheet for the new mattress and it came out perfectly. Now off to purchase some fun fabric, maybe a retro print. Wonderful tutorial!
Thank you Paula! Congratulations!
For our king size bed I bought two sets of sheets at once. I used one fitted sheet to cover the box springs. The other, for the bed. We had two flat sheets and two sets of pillow cases to rotate. When the fitted sheet began to wear out, it went below, to cover the box spring while the “new” fitted sheet went to the bed. Now, the second fitted sheet wore out. I just made a new fitted sheet using one of the flat sheets. thanks to your good instructions! We now are good for a few more years of these sheets which I want to keep because they match the decor of our bedroom.
Great ideas Martha! I’m glad you found the instructions helpful. (and I’m a big fan of frugality) 🙂
I have spend 3 hours searching for a formula to make a fitted sheet for mattresses with different depth sizes. My nephews’ mattresses are 4 inches & my niece’s is 5 inches. I finally found your site when I was about to give up. I am going to guard this information with my life & make several copies to keep in my sewing room, a chest drawer, a binder & in my computer desk. Thank you so much. I will recommend your site to others.
Thank you so much Maggie! I’m glad the instructions worked for you!
I loved making your fitted sheets, I made two: one for toddler bed and one for day bed mattress. I did both with my serger sewing machine, including the elastic.I had to piece my fabric for the day bed mattress since my fabric measured only 40″ wide. The seams ended up on the side of the mattress,so that ended up fine. Only changes I made were; I used 3/8″ elastic instead of 1/4″. Also started my elastic 9″ before corner like you did but then continued elastic all across the width of top and bottom of mattress. This helped to make fitted sheet fit tighter. Your measurements were perfect! I really enjoyed doing the whole project with the serger!!!
So glad they worked for you Susan!
As a new sewer, AND a new Rver, I need to make a couple fitted sheets for our bed. Why buy, when you can make.
That said, I was confused (at first ) when you gave the 8″ measurement “X2”, but finally my slow operating mind caught on to the idea that it was 2X 4. duh me..
Thanks for the tip. happy man here. Plus I think my wife is gonna like it also.
Thanks again,
Jack
So glad it helped Jack!!! And way to go!!
I am a beginner in sewing and I find your instructions easier to understand, and follow (unlike some posts I have checked out). thanks a bunch! 🙂
Yay!!! So glad PJ!
I have 10 inch tall queen mattress, and cal king flat sheet, and I had to cut off the side of the sheet and sew it on the end to make it tuck in enough. First one I didn’t, and that one keeps slipping out at the end. Your instructions are great, however I decided to pin, because mattress corners are rounded, not straight as in the box, so I fee I get better fit this way, but I am sure it is okay like you did too.
Glad you found a way that works for you Daiva. I’m definitely a lazier seamstress. LOL!
Instead of stitching the elastic to the sheet, Can i not make a running slot through the entire edge of the sheet and then insert a elastic through the slot and tie both the edges together with tightening as much as i want
This way I can adjust the tightness of the elastic
Yes, that will work quite well Neerja! Best wishes!
This worked out great. My husband has restless legs & his side of the fitted sheet always ends up with a worn tear so I buy more sheets & end up with a bunch of flat sheets & no fitted sheets. He now thinks I’m a genius. Perfect!
You are a genius Kelly!!
(On a sidenote – I had restless legs at night and found that a good magnesium helped immensely!)
I detest all twin sheets for bunk beds in RV. I gave it allot of thought and the method I came up with, I took a twin flat sheet and more less made a large pillowcase for the mattress. Measured the mattress and folded sheet over and sewed a seam across bottom and sides, turned inside out, left wide hem part as was and that’s the opening as for a pillow case, fits mattress great, no excess sheet to fight as well. I’ve only made one set , need to get busy and make an extra set.
Sounds like a brilliant idea Terah!! Love it!!
Thank you for your tips. I used your idea and made a cover for the cushions on my couch from an old flat sheet. Perfect the first time I tried and that rarely happens.
Have I got this right ? 16-18″ elastic sewed around each corner only ? XOX Kristi
I’ve been searching the web for easy to follow instructions on this. And you’ve provided! Thank you so much, and I’m excited to try this. We just bought a bunk bed and I have zero sheets! I hate walmart, and they’re the only place I’ve found that sells cheap sheets. This way, I can make my own with American made goods 🙂 woohoo!
Thank you so much for the fitted sheets instructions! You are awesome and a life saver!
Hi, I am making fitted sheets from flat sheets for a friend. Her bed is 80″x80″x16″. The sheet is 92×108″. I can’t figure out what size to cut out for corners. Please help.
How do you figure out the amount of elastic if you are stitching elastic all the way around? Twin? Queen? King?
I have adapted this method to make a washable cover for my large rectangular ironing board. It is perfect!
Oh that is a GREAT idea! I have a tabletop ironing board for my heat press but it needs a better cover. Thank you Elizabeth!
we will be doing it to do fitted quilt for my grandaughter twin bed
That is a great idea Celia!